Chapter 2 - Trustle Organization Setup with Okta
Using Trustle with Okta
We've provided an introduction to the concepts around Trustle, but the best way to learn from this point onward is to get hands-on and run through some examples in real life, so lets begin!
Prerequisites
In Chapter 1, we had you setup a Trustle Teams trial. To complete this chapter, you'll need to create another free account, an Okta account (Select Workforce Identity Cloud -> Free Developer Edition).
Chapter Overview
To best demonstrate Trustle’s functionality, we’ll base our tutorial use case on a fictional organization called Vandelay ImEx.
At Vandelay, their org-chart looks like this:

In this chapter, we'll:
- Populate our Okta IDP user directory with users to reflect this org chart
- Add the Okta/Trustle Integration
- Sync our Trustle User directory with Okta's People Directory
- Link Okta users and resources
Import Users into Okta
As the Okta Admin, login to Okta
Copy the below text into a file, and save as okta_users.csv
login,firstName,lastName,middleName,honorificPrefix,honorificSuffix,email,title,displayName,nickName,profileUrl,secondEmail,mobilePhone,primaryPhone,streetAddress,city,state,zipCode,countryCode,postalAddress,preferredLanguage,locale,timezone,userType,employeeNumber,costCenter,organization,division,department,managerId,managerme+headhoncho@example.com,Head,Honcho,,,,me+headhoncho@example.com,CEO,,,,,,,,,,,,,,,,,,,,,Corporate,,me+alice@example.com,Alice,Au,,,,me+alice@example.com,CTO,,,,,,,,,,,,,,,,,,,,,Engineering,,me+bob@example.com,Bob,Brass,,,,me+bob@example.com,CFO,,,,,,,,,,,,,,,,,,,,,Finance,,me+cal@example.com,Cal,Coder,,,,me+cal@example.com,IT Manager,,,,,,,,,,,,,,,,,,,,,Engineering,,me+dina@example.com,Dina,Davis,,,,me+dina@example.com,Engineer,,,,,,,,,,,,,,,,,,,,,Engineering,,me+ed@example.com,Ed,Ellis,,,,me+ed@example.com,Analyst,,,,,,,,,,,,,,,,,,,,,Finance,,Open the file as a CSV
Replace all occurrences of the string example.com with your email domain name.
Replace all occurrences of me with your email username.\ \ NOTE: If your email system supports it, this will make it so each of these users' emails forwards to your email address, making following this tutorial easier. If you'd rather take a different approach to defining these emails you may, but keep in mind you won't be able to login as a Trustle user (in this case, synced from an Okta user) unless it has a valid email address that can be replied to.
Save the changes.
Navigate to Directory -> People within the Okta UI.
Click More Actions -> Import Users from CSV.
Browse to this file, upload it, and click next.
Select Automatically activate new users, and click Import Users.\ \ You should now get multiple emails asking to set passwords from Okta. Its advised to right-click on open in an incognito window to prevent cookie/state issues.
From your email, follow the link to activate each Okta user account with a password. (You can choose to setup security questions later.)
Close the Incognito window to kill the session, and repeat for each account.
When done, your Okta people directory should look similar to the following:

Adding Okta Groups
To demonstrate Trustle's JIT access request workflows, let's add some sample groups to Okta that we can request access to.
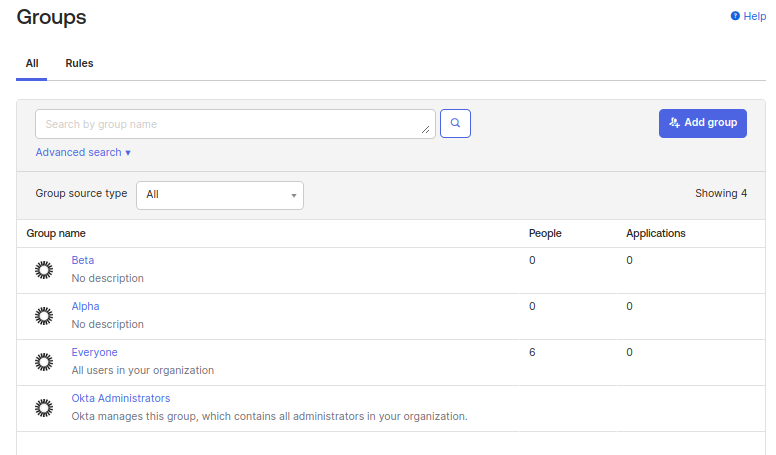
1. Navigate to Directory -> Groups
2. Click Add group, and repeating twice to add two groups, Alpha, and Beta.
Once you've added the two groups, refresh the page, and you should your two new groups in the list, similar to below:
Setting up the Okta/Trustle Integration
Now that Okta is setup, lets integrate it with Trustle so we can use it as a source of truth for Trustle Users, as well as pull in Okta-related resources to provide for just in time (JIT) access requests, as well as monitor for ID-related threats.
Adding the Integration
Login to Trustle as the Org Owner (person who created the Trustle account.)
Click Manage -> Add System -> Okta
For name, we'll call it okta-hr (but you can call it anything you'd like) and click Save
On another tab, login to Okta as Admin
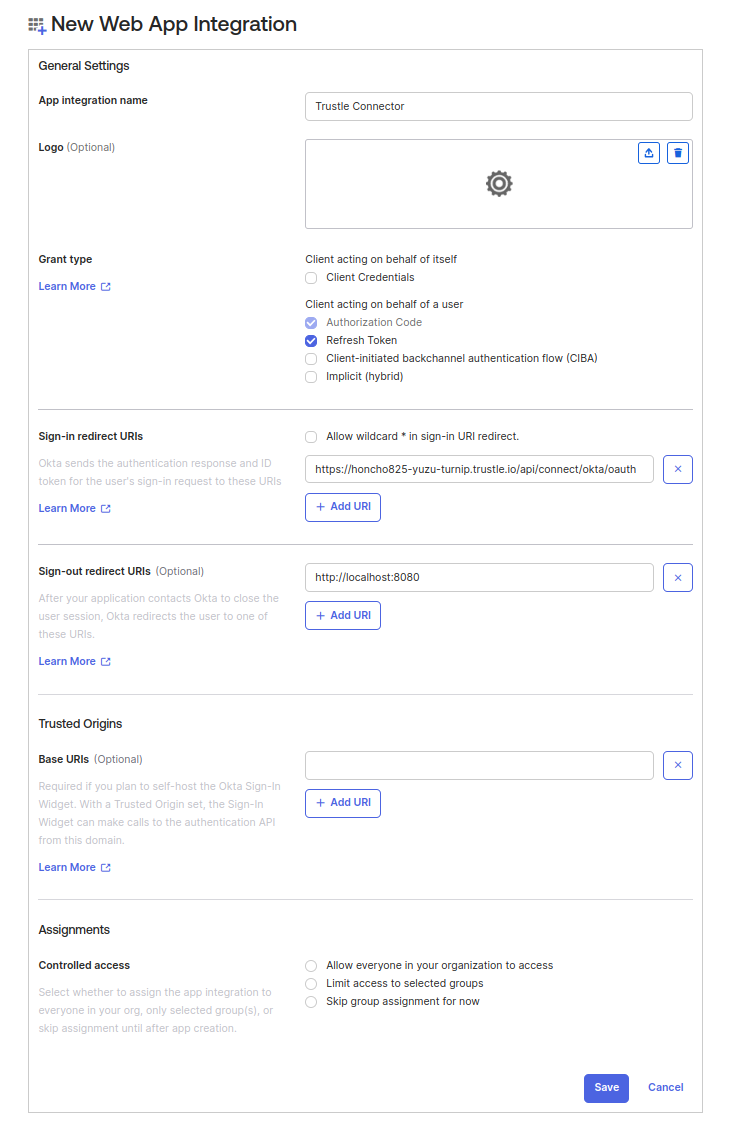
Select Applications -> Create App Integration -> OIDC - OpenID Connect -> Web Application, then click Next
For App Integration Name, enter Trustle Connector
For Grant Type, select Authorization Code and Refresh Token
Go back to the Trustle app, and click the Guide: Setting up an Okta Connector link. \ \ It will open a window with installation instructions. The only thing you need from this page to complete this installation is the Redirect URI value at the bottom of the page, under Configuration Steps. Copy that URI value.
Go back to the new Okta App tab.
For Sign-in redirect URIs, paste the value you just copied from the Trustle install instruction page.
For Assignments -> Controlled access, select Skip Group Assignment for Now.
Your configuration should look similar to the image below:
Click Save at the bottom.\ \ The General tab of the Trustle Connector app should now be displayed.
Click Okta API Scopes
Click Grant for the following:\ \ okta.apps.manage\ okta.apps.read\ \ okta.groups.manage\ okta.groups.read\ \ okta.logs.read\ \ okta.roles.manage\ okta.roles.read\ \ okta.users.manage\ okta.users.read\ okta.users.read.self
Click the Assignments tab.
Click Assign -> People -> "The Okta Admin User you are currently logged in as" -> Save and Go Back -> Done.
Click the General Tab.
Copy and save for later the hostname of the Okta Admin URL, but only the first two strings seperated by a dash, eg, dev-1234567 (do not include the -admin...)
Under Client Secrets, click the copy icon and save this secret for later.
Under Client Credentials - Client ID, click the copy icon and save this Client ID for later.
Go back to the Trustle "Add a New Okta System" tab.
For Organization ID, enter the dev-123... hostname you copied previously.
For Client ID, paste the value you copied earlier.
For Client Secret, paste the value you copied earlier.
Click Authenticate
NOTE: When the login screen appears, make sure you are logging in to Okta as the same user you had assigned the app to.
Upon successful login to Okta via the Trustle OAuth redirect, you should see a confirmation dialog similar to below.
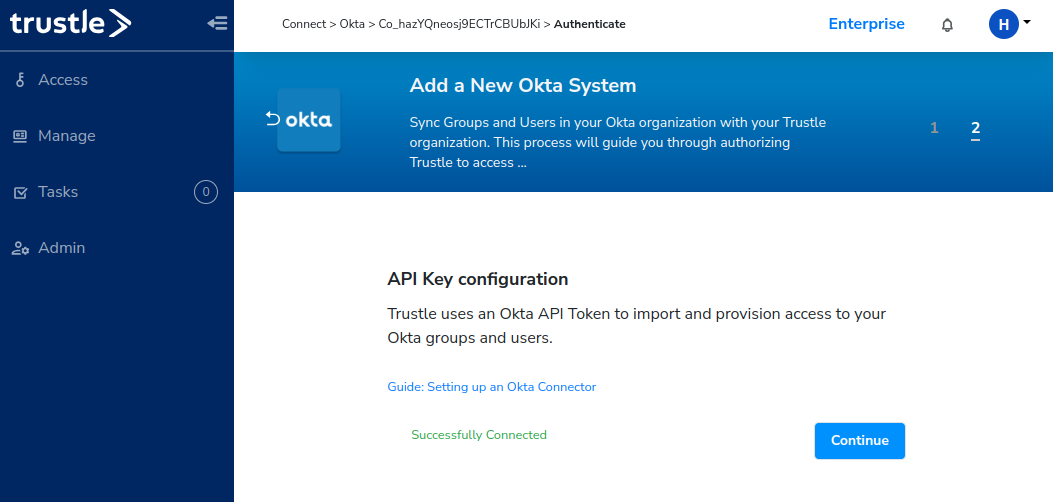
Click Continue.\ \ Trustle will sync data from Okta via the integration. After a short time, the new Okta Integration appears.
Configuring the Okta Integration
Now that we've successfully integrated Trustle with Okta, lets review the integration's settings. From the manage menu item on the left sidebar, click okta-hr, and then Settings.
The System Settings screen appears. Here we can see the system name, and it's Owners and Provisioners. By default, this system is not managed or visible to our end users. Let's change that now. Under Default System Settings, set this integration to Managed, and Visible, then click Save.
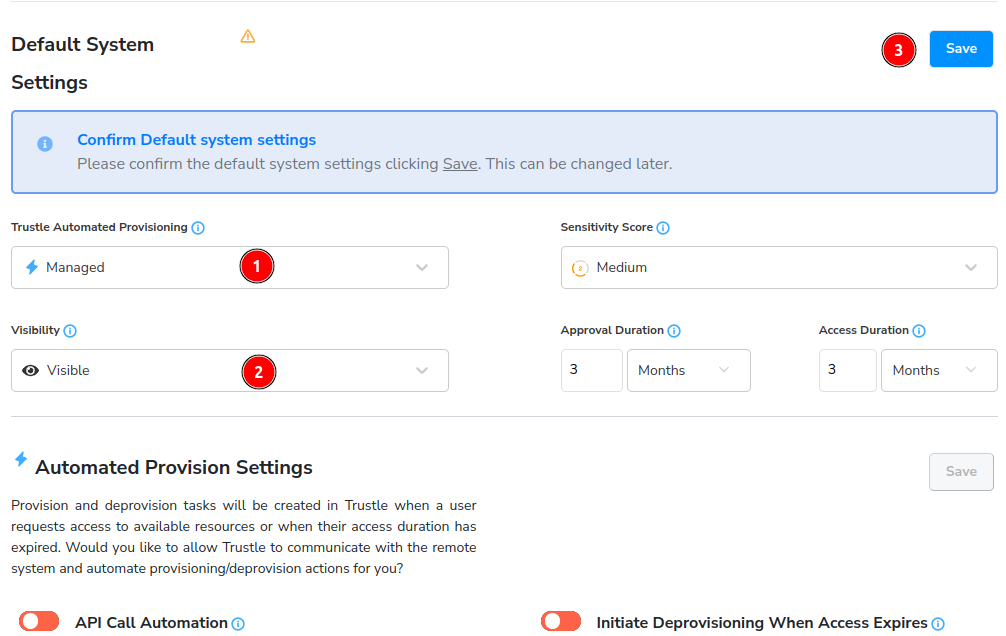
Trustle is now managing our okta-hr resources, and is making them visible to those who which to browse for them to request access to them.
Next, let's enable user sync from Okta. This will make it so users can login to Trustle based on their Okta identities.
Click the Connection Settings tab.
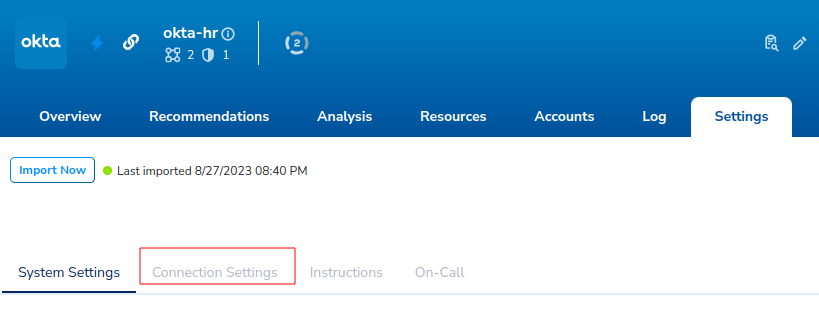
Scroll to the bottom, then enable Retrieve service usage data and Enable User Syncing.
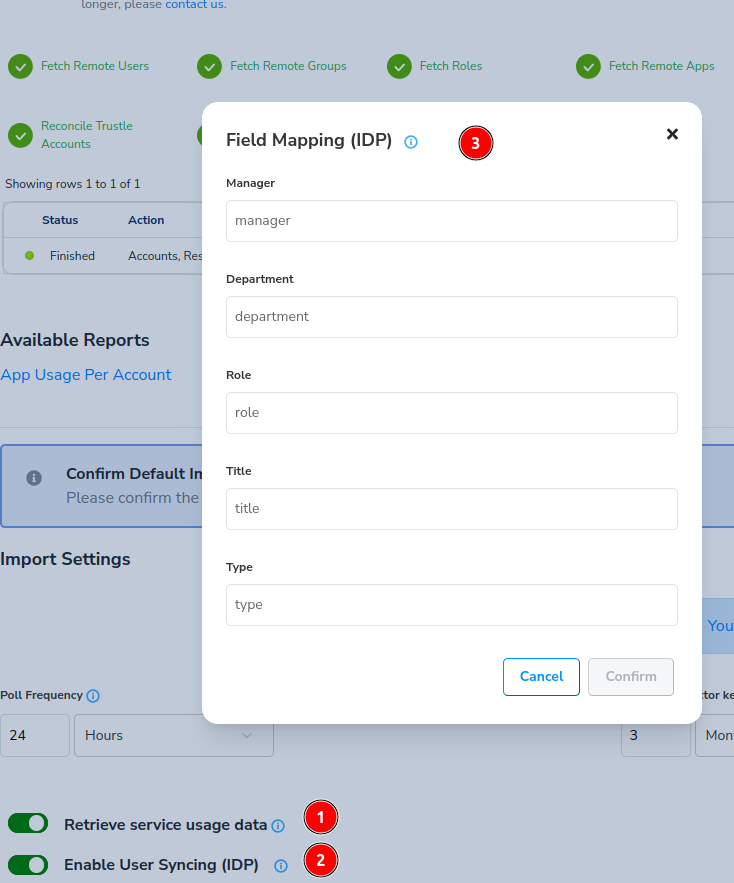
When we bring in user identities from Okta, we want to make sure the attributes are mapped correctly. Enter the proper values for these mappings, and click Confirm, and then Save when done.
Sync Okta Users to Trustle
In order to use Trustle, your users must login to Trustle via a Trustle User. You can create Trustle users manually, or you can sync them with your Okta People directory (or both.) Let's begin by showing you how to sync from Okta.
- From the Trustle side menu, click Manage -> okta-hr -> Settings -> Import Now.
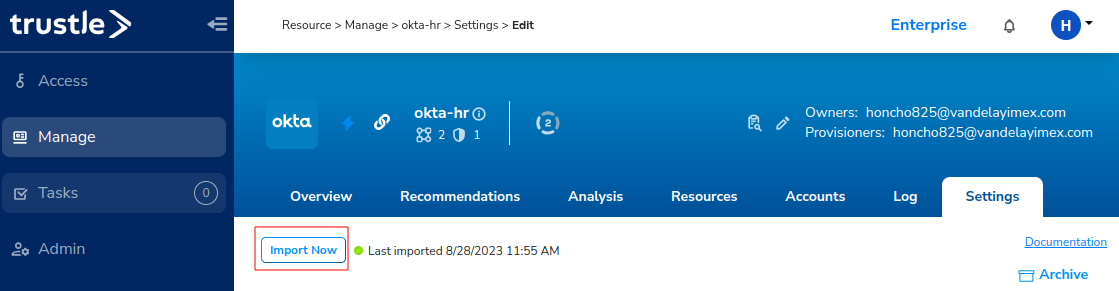
When the import completes, you will get a banner message stating the same.
- Click Accounts -> Sync Users.
You should see a Sync Users dialog appear with five New entries on the New Tab.
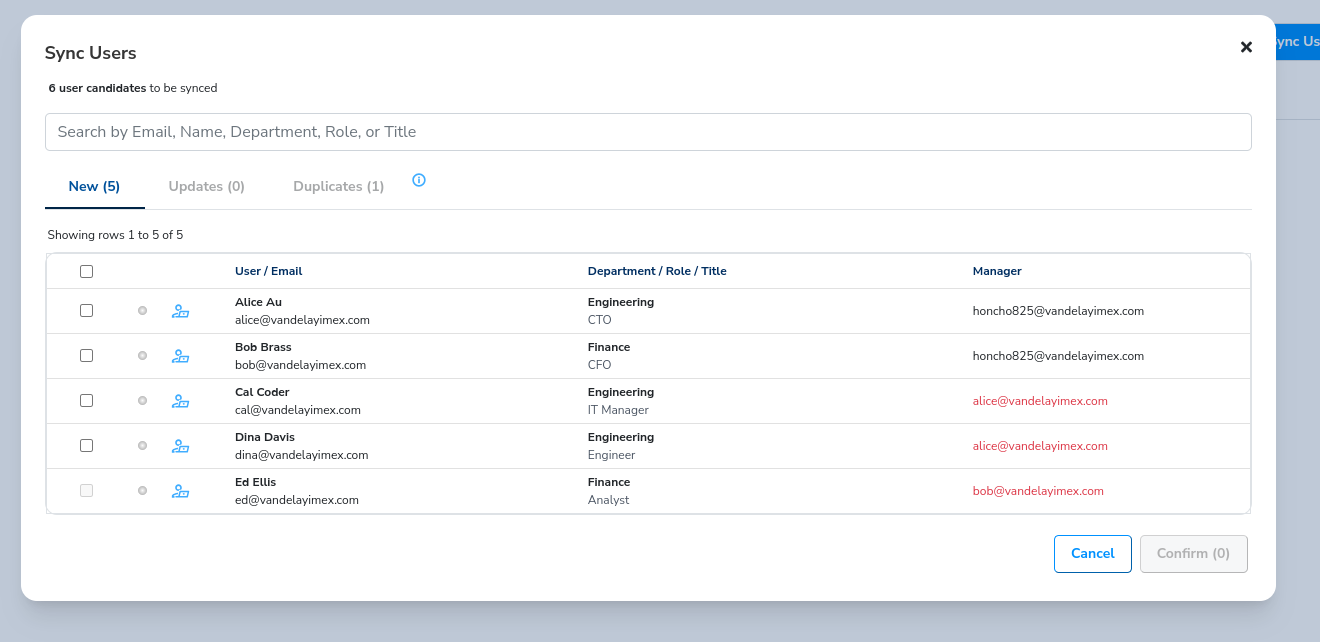
We see that the firs two users Alice and Bob are managers. We can't import in Cal, Dina, or Ed (indicated in red) until we've imported their managers first.
- Select Alice, and Bob, and click Confirm.
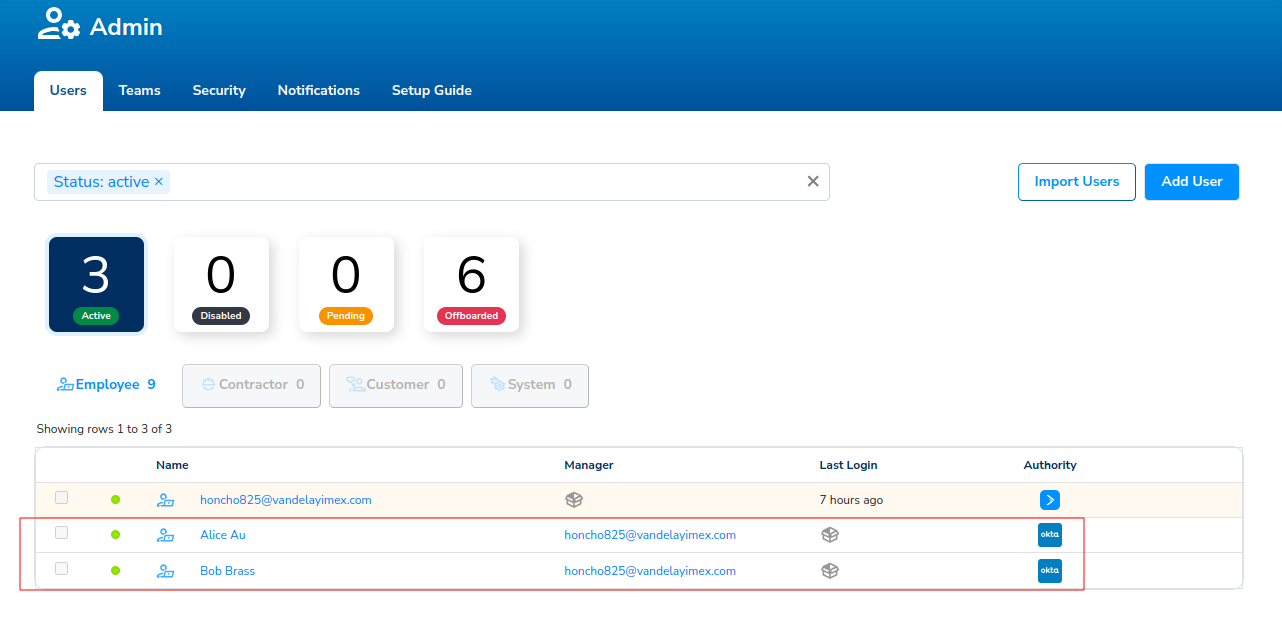
Let's now navigate back to Admin -> Users. We now see, in addition to our Organization Owner Head Honcho, two additional Trustle Users, Alice, and Bob, with Okta having authoritative control of them:
NOTE: When Trustle syncs new users in Okta, it creates their Trustle-side login credentials, and sends them an email asking them to setup a password. Once this password is setup, these users can now login to Trustle to request access and interact with Trustle's ITDR features.
Lets go back to Manage -> Okta -> Accounts, and click Sync Users again:
We can now see Cal, Dina, and Ed have a valid manager, and can be imported.
- Select Cal, Dina, and Ed, and click Confirm.
- Go back to Sync, and click the Duplicates tab.
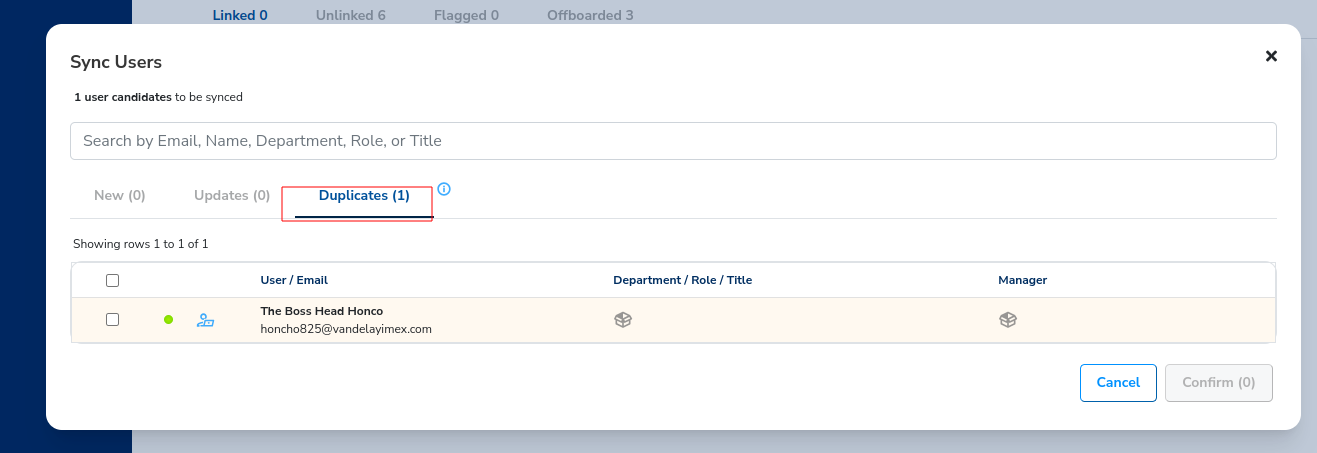
Duplicates indicate a user exists both in the local Trustle User DB, as well as in the Okta IDP. If you'd rather delegate control of this user to Okta, you can select and click confirm. Otherwise, to continue Trustle's ownership of this user, you can take no action on it.
In our example, we'll take no action on it.
- Click Cancel.
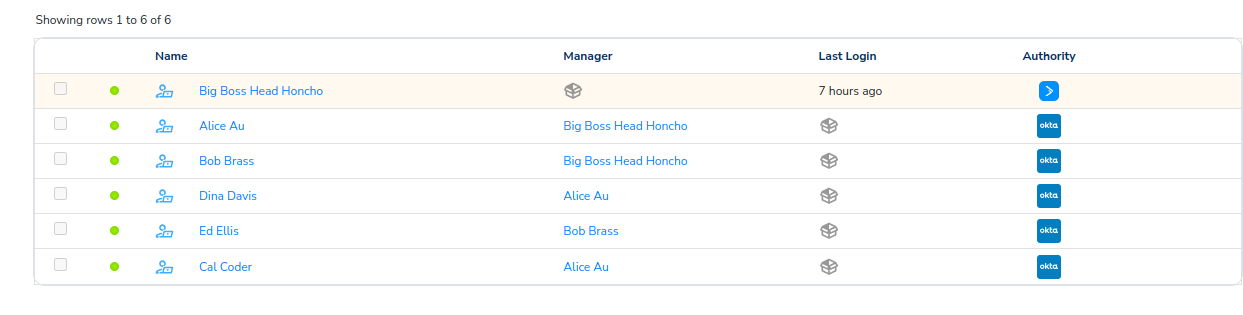
Let's now navigate back to Admin -> Users. We now see, in addition to our Organization Owner Head Honcho, we now have five additional Trustle Users, Alice, and Bob, Cal, Dina, and Ed, with Okta having authoritative control of them.
Linking Okta People to Trustle Users
Trustle helps you detect when you have non-accounted for identities. It does this by enabling you to link Trustle Users account imported in via integrations.
Take for example Alice. Let's link her Trustle User to her Okta Person account.
- Click Manage -> okta-hr.
- Click Accounts.
From here we can see which Okta accounts have been mapped and which haven't. We see there are zero Linked accounts.
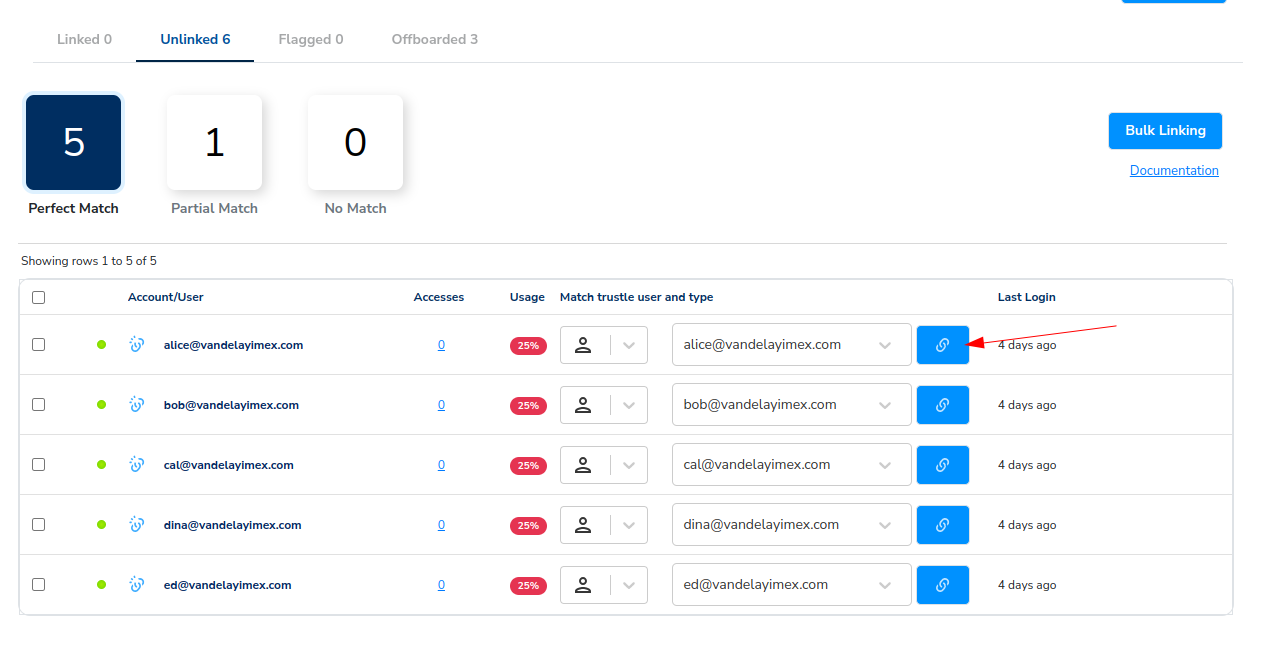
- Click on Unlinked.
When you click on Unlinked we see there are six, categorized by username auto-matching.
- Click Perfect Match.
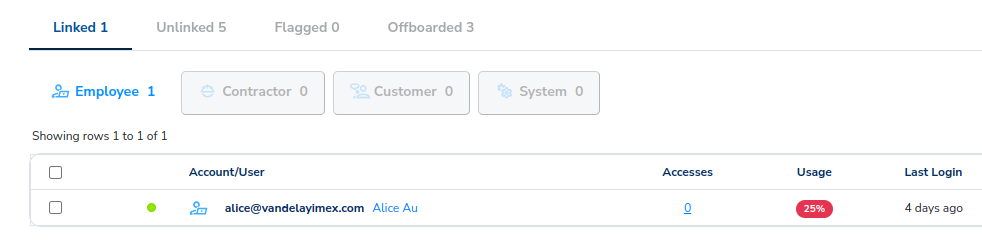
Here we see Alice's email, along with four other users' emails, perfectly match those of their Trustle username. (As they should, since they were derived from Okta.) Let's now link Alice's Okta Person to Alice's Trustle Account.
- Click the Link icon next to Alice.
The Linked tab now shows one user linked.
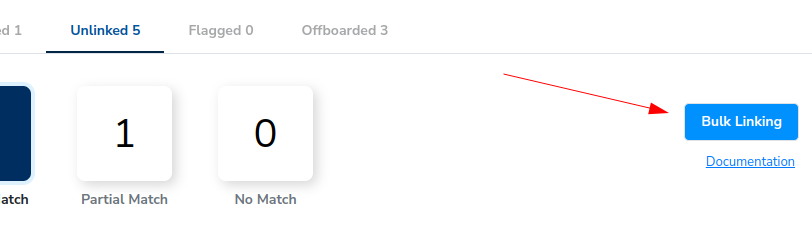
We have successfully linked Alice to her Okta person. In addition to linking Alice from this UI, we can also select the Bulk Linking button to map users via CSV.
You can click the Documentation on the screen to get step-by-step instructions on how to use the bulk linking feature.
We just demonstrated the ad-hoc method of linking accounts to users. This is useful when we know user(s) from a specific account need to be linked. Trustle also provides unlinked user detections from the Recommendations tab, and we'll cover that next.
Okta Threat Detection and Response
Trustle regularly scans your integrated services for identity-related threats and response (ITDR) suggestions. It monitors at both the integrated system, and account level.
To view the Okta-based ITDRs, click the Recommendations tab. ITDRs are scoped by System and Account, and a composite Trustle Score displays your aggegrate security posture regarding this Okta system.
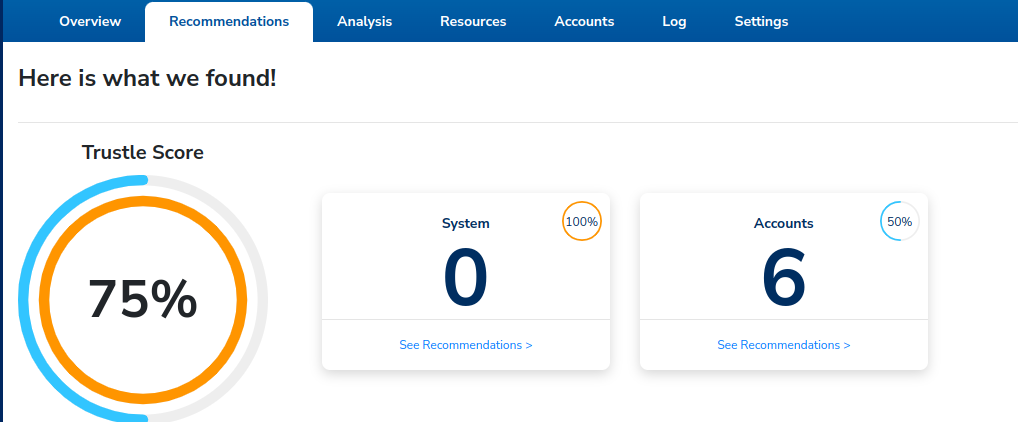
There don't appear to be any System-related detections, but we can see there are six account-related detections.
- Click on the Accounts button from the Recommendations tab.
We're taken to the Okta Account Threat Detections page, where from the default view, we can see there are five unlinked accounts. We can link them directly from this screen.
- For each unlinked account, link it to the corresponding proper owner (the Trustle User with the same email as the Okta Account.)
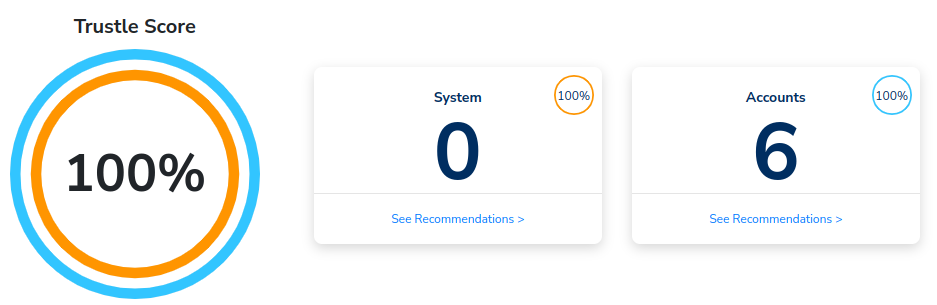
After Trustle re-runs its risk analysis (this may take some time, depending on what your default is set at under settings), the Recommendations page will show a Trustle Score of 100%, indicating all detected threats at this point in time have been addressed.
Viewing Okta Resources
Now that we've linked our users to accounts, we can view our Okta-based resources, and their assignments by user.
- Click Resources -> Applications
- Click Expand All
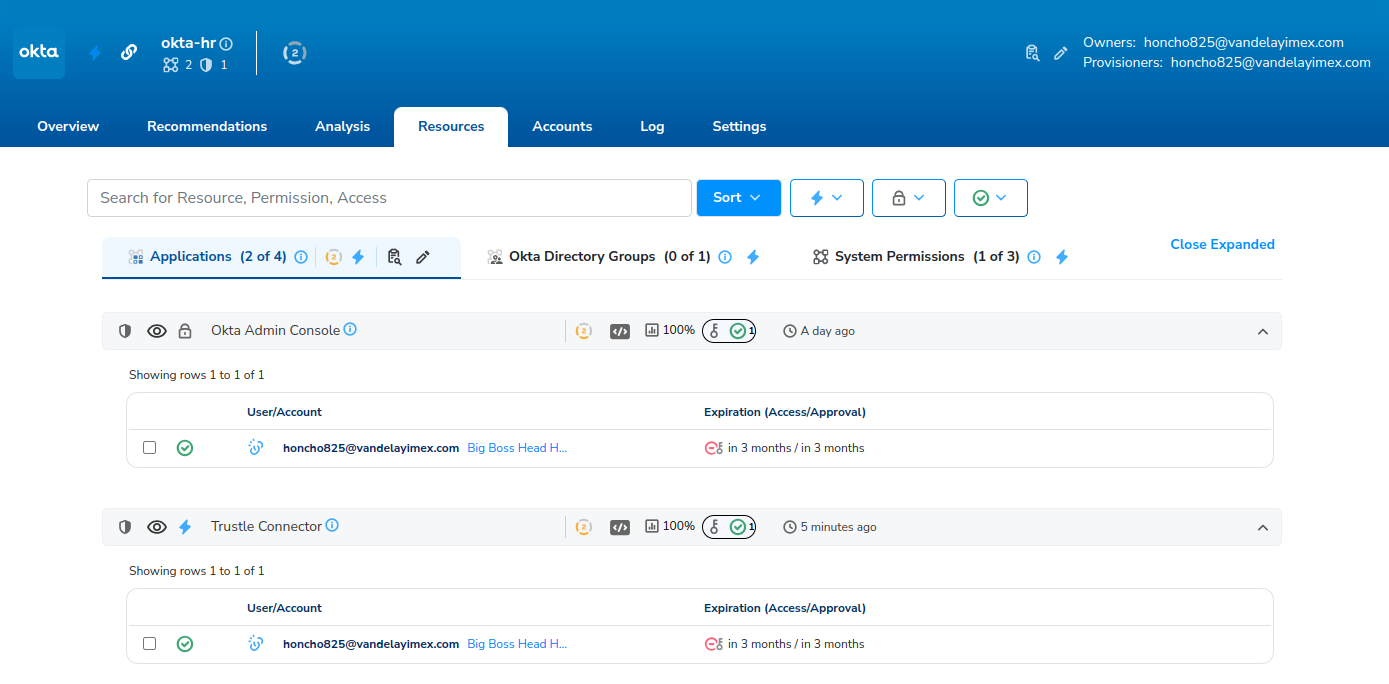
We can see all Okta Applications, and their accompanying user assignments in a single view. By clicking the detail icon next to each user
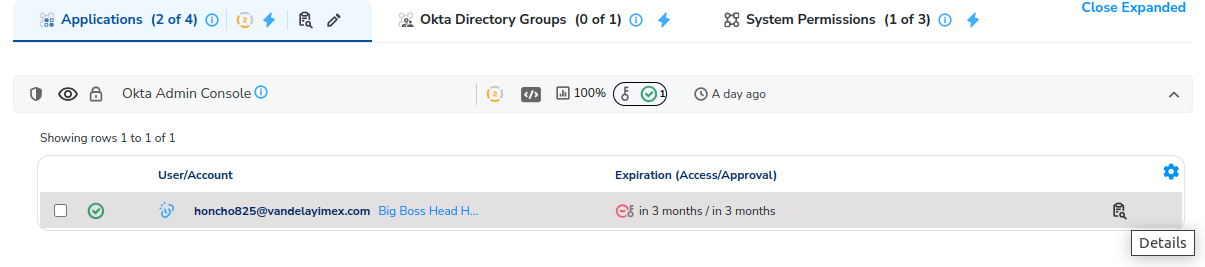
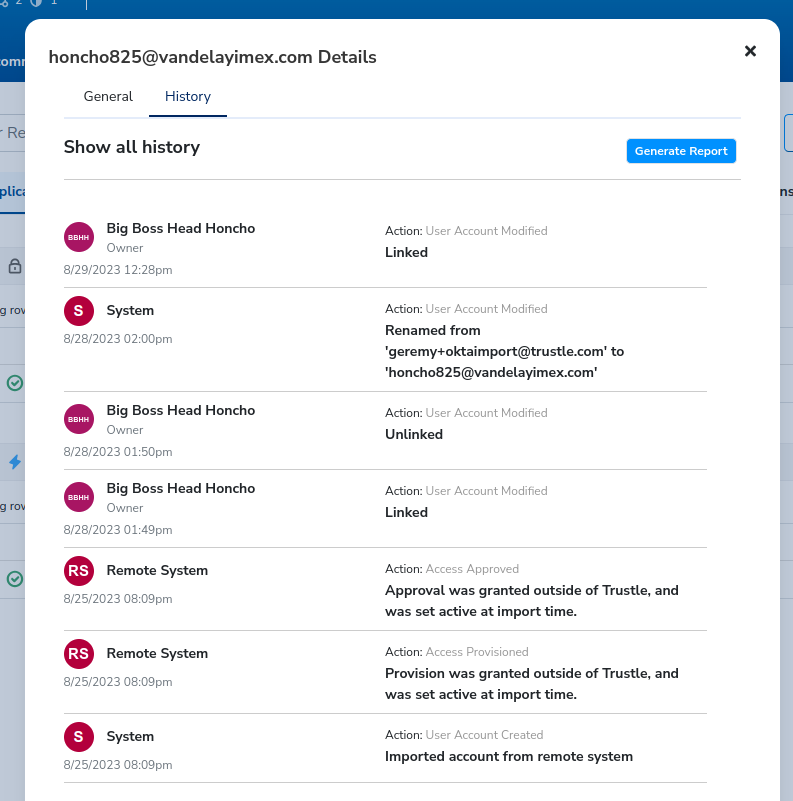
We can get general information about the user and resource, including history, as well as the ability to generate a report which can be shared and used for auditing purposes from it.
Viewing Okta Accounts
In the same way we can view all resources and their assigned users in a single view, we can also view all users, and their assigned resources in a single view as well.
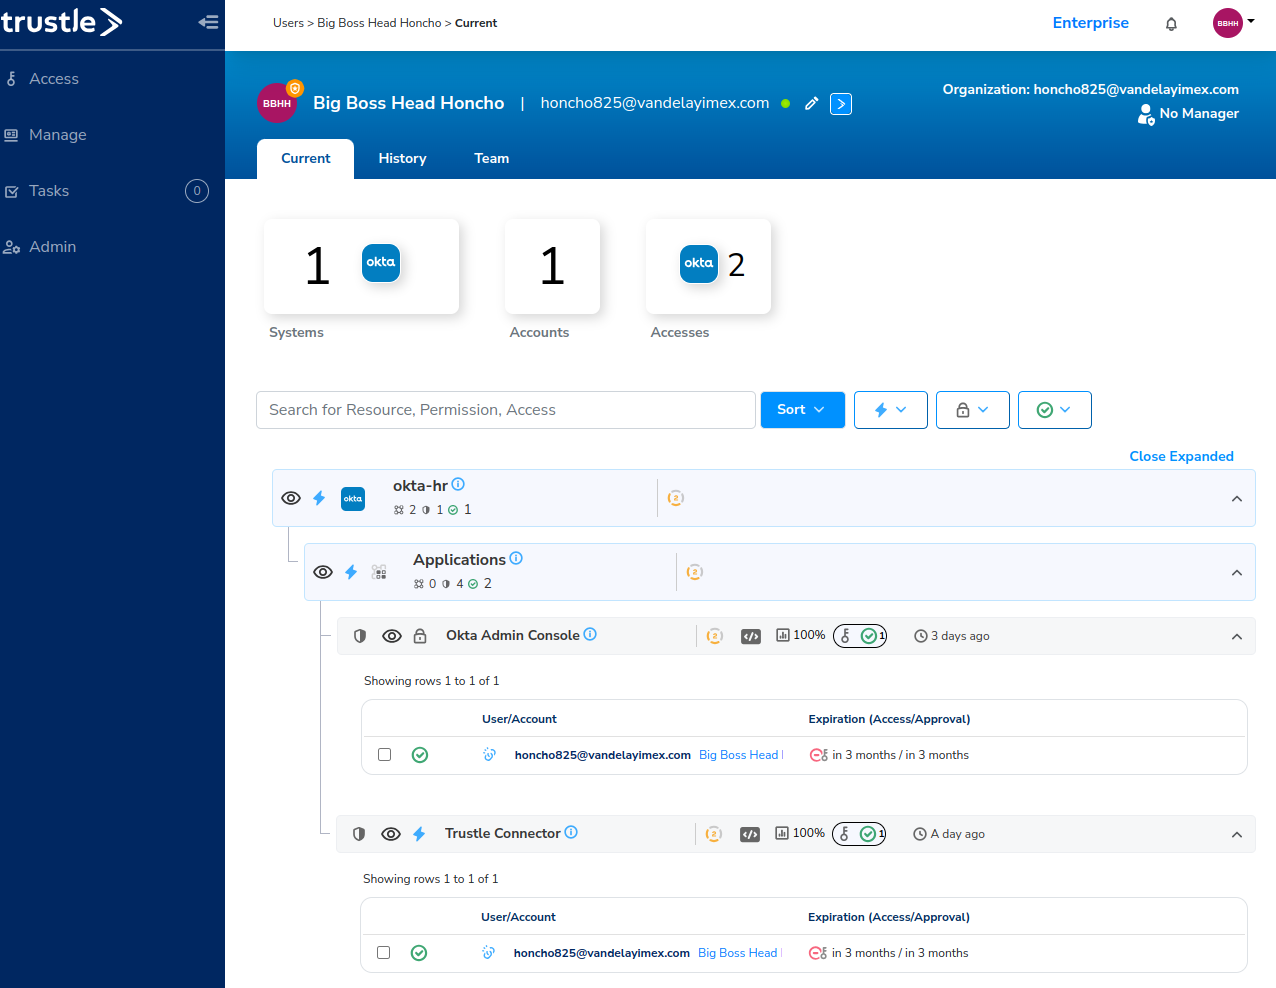
- Click Accounts -> Big Boss Head Honcho
- Click Expand All
Here we can see all the resource Big Boss is assigned to, as well as details and history as well.
JIT Access Requests with Okta
Now that we've set the system up, let's demonstrate a JIT access request from one of Vandelay's users, Alice. To do this, in a new browser window (that does not share the session with the one you are currently logged in as, eg. incognito session) login as Alice.
Once logged in, click the Access menu.
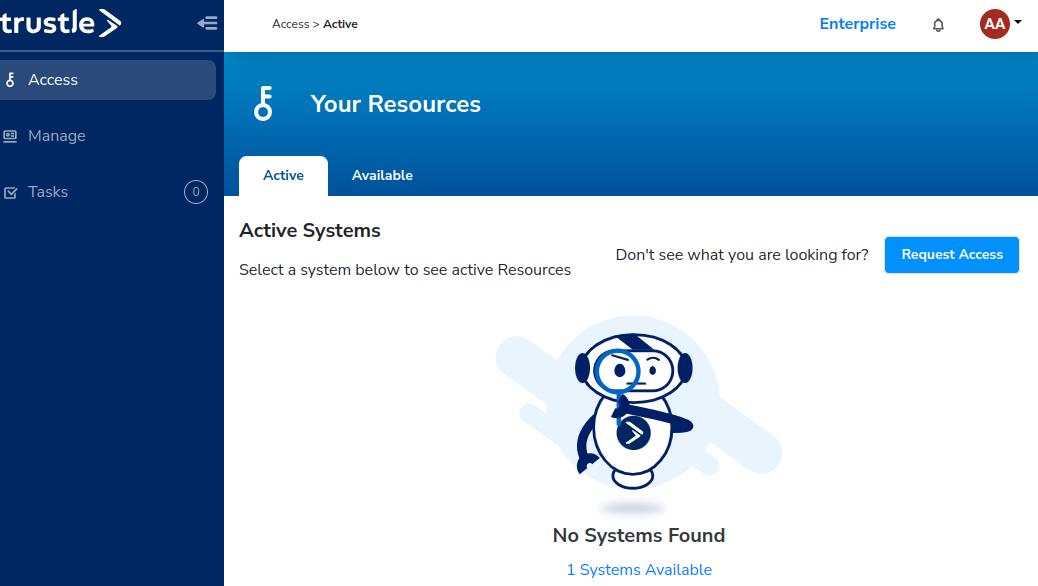
The screen opens on the Active tab. As indicated by the page, we currently have no access. We want to request access to Okta Group Alpha, so we click on the Available tab.
Under Available, we now see Alpha, Beta, and Okta Administrators groups.
NOTE: In situations where you want to hide certain resources from being presented in the Available Access screen (for example, Okta Administrators), from Manage okta-hr -> Resources, you can set that group to invisible.
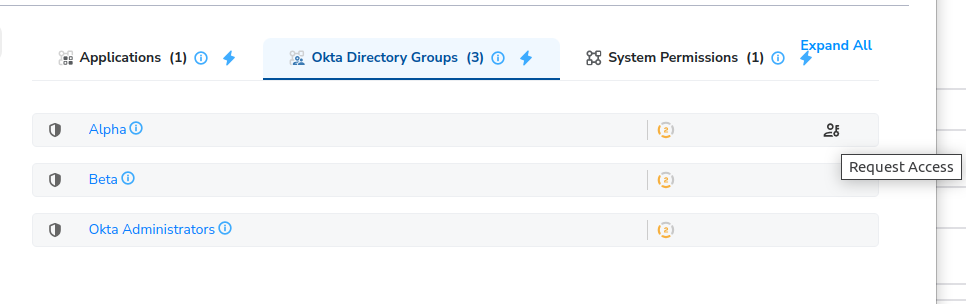
By clicking on the Request Access icon to the right of the Alpha Group, we can bring up the request access screen.
- Click the Request Access icon next to Alpha Group (do not click the big blue Request Access button.)
- Set yourself (Alice) as the User.
- For reason, you can enter anything germane to the request.
- Click Request.
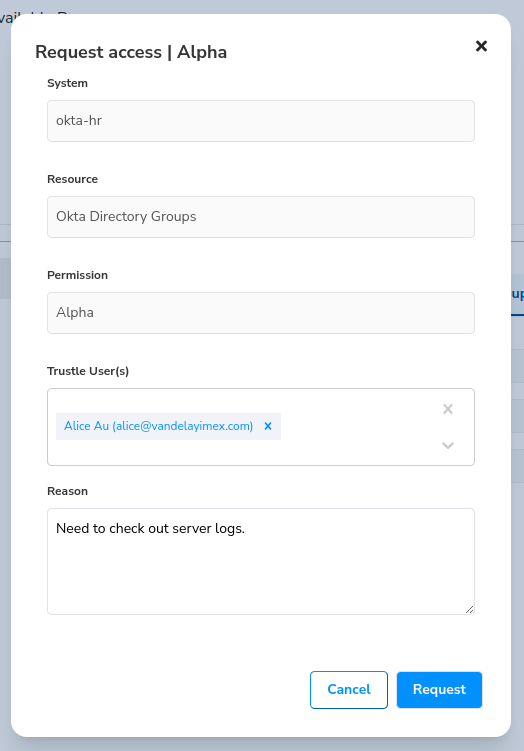
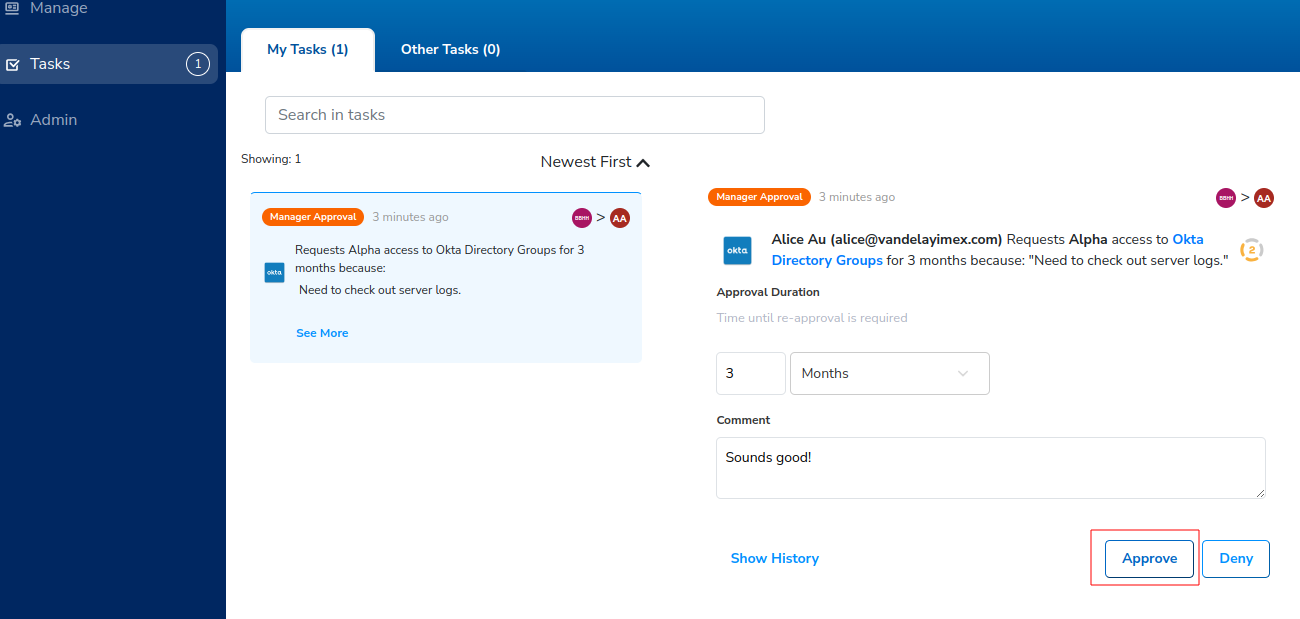
Alice has just sent a request for access to the Alpha Group in Okta. As Alice's Manager, you should receive an email stating the same. Also from your (Head Honcho's) Trustle tab, you should now see a Task count of (1) next to Tasks.
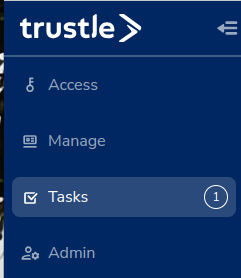
- Click the Tasks menu to be brought to the Tasks screen.
From here you can see there is a Manager Approval task waiting approval or cancelation.
- Click on the task to bring it into focus.
By default, before access can be granted to a resource, the manager must approve it.
- Enter "Sounds good!" for the comment, and click Approve.
Now that the approval process is complete, within a few seconds, a new task will appear under Tasks. It is a provisioning task.
By default, Trustle implements an interactive provisioning process, that is, when its time to actually move a user in or out of a resource, Trustle prompts whoever is defined as the provisioner to carry out this step (in this case, the person who installed the integration, Head Honcho.) We can add others to this provisioner list to take the load off a single person and scale the provisioning process when in interactive provisioning mode. And later on in the tutorial, we'll show you how you can completely automate the provisioning step as well, so that its automatic, and does not require any sort of human interaction.
If we bring this task into focus, we can see that its requesting Head Honcho to move Alice into the Alpha Group in Okta.
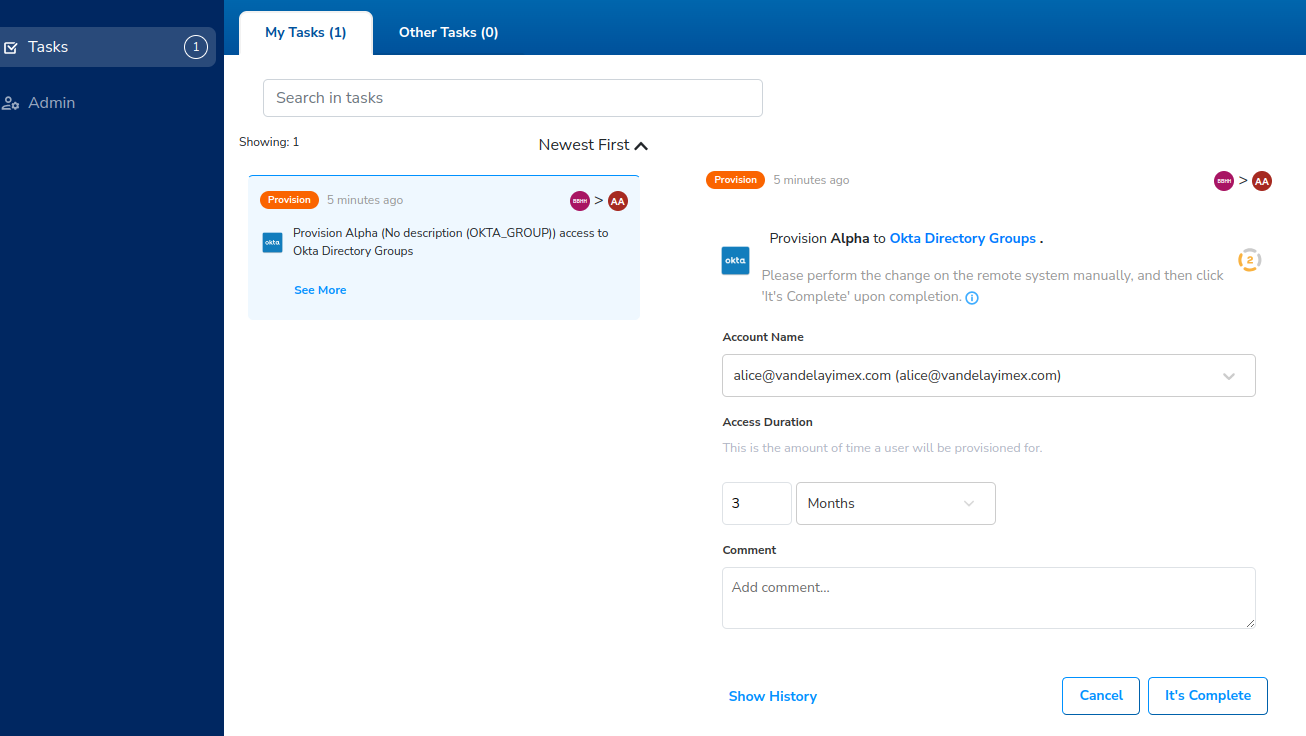
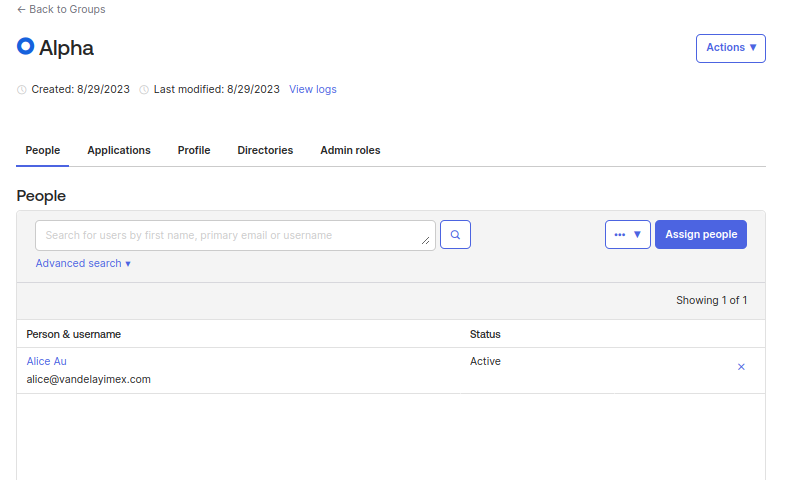
- Login to Okta, Click Directory -> Groups -> Alpha -> Assign People -> Alice -> Done.
- Go back to Head Honcho's Trustle tab, and click It's Complete.
If Alice goes back to her Access Available tab, she can now see the access was granted.
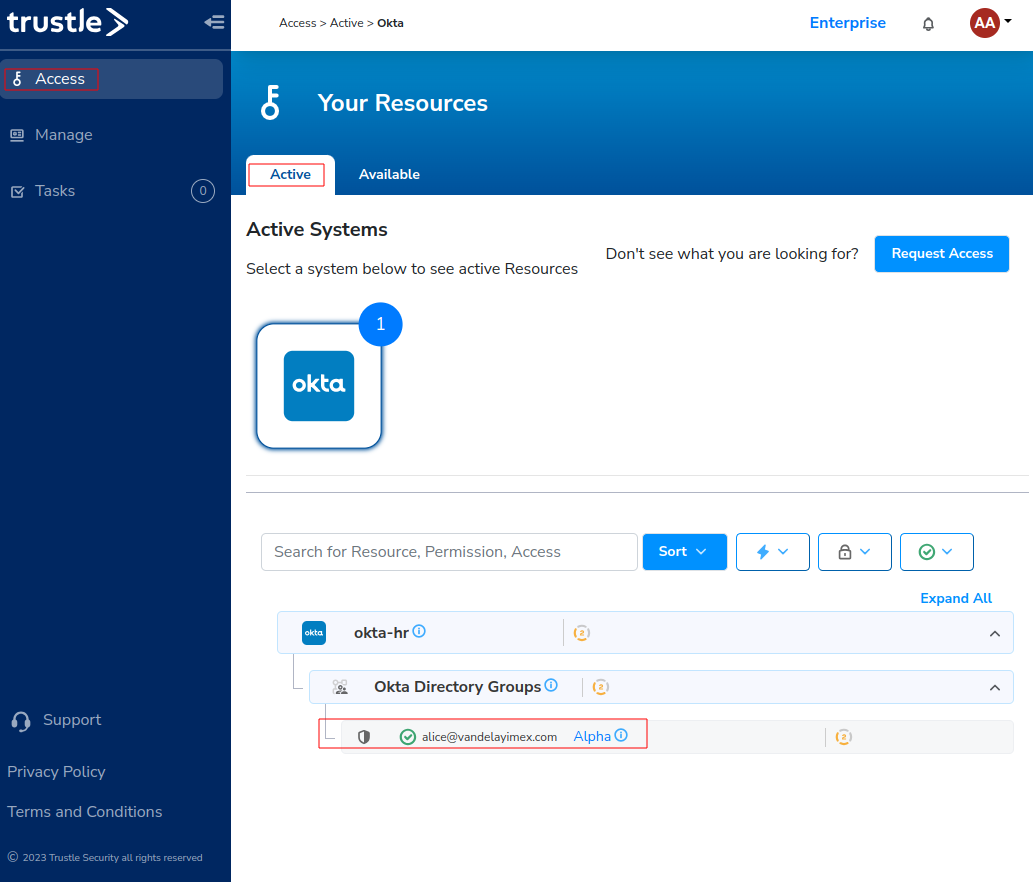
She can now proceed on her way with Alpha Group Okta entitlement.
As described in Chapter 1: Workflow Example, --Need link-- Alice now has 3 months duration of LPA and Manage Approval to the resource.
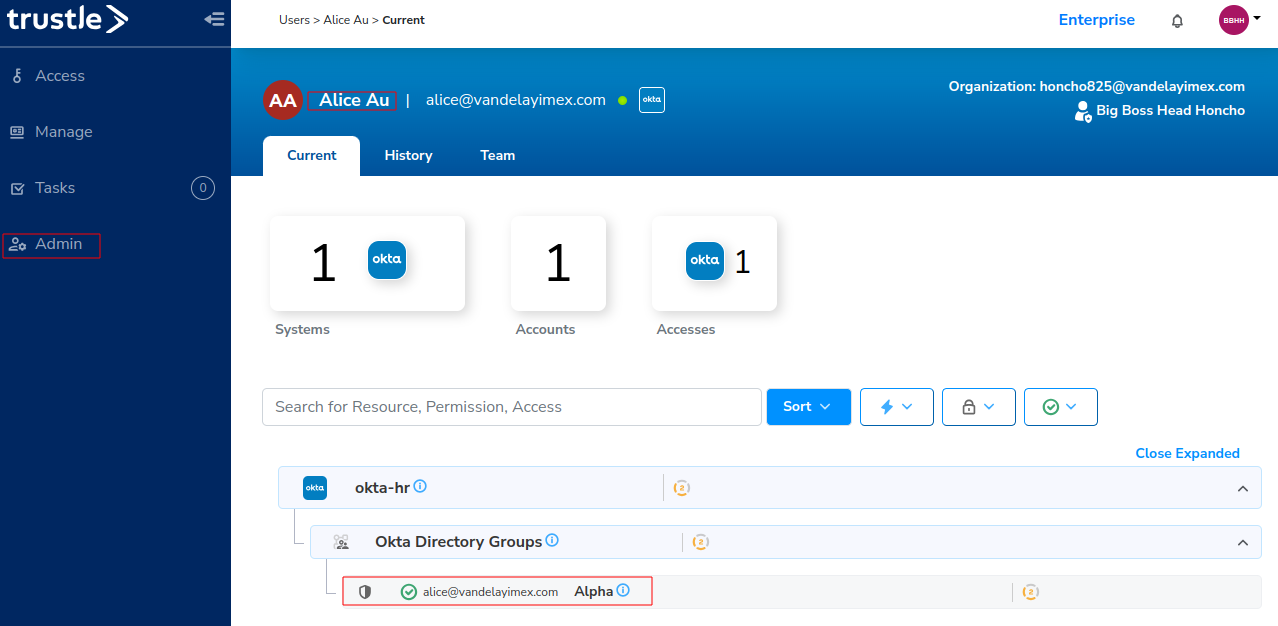
The manager can now also see from the Trustle User View (Admin -> Alice -> Expand All) the permissions Alice now holds:
Conclusion
We've demonstrated how to setup the Okta integration with Trustle, import and sync users, link them, then perform a simple access request workflow with an Okta group.
Lets build on this architecture by adding an AWS integration in the next chapter.