Chapter 3 - Adding the AWS Integration
AWS Integration with Trustle
As we saw in the last chapter, Trustle Integrations link Trustle to your organization’s connected systems. In that example, we configured the Okta integration to sync Trustle users and manage Okta-related data. In this Chapter, we'll demonstrate the benefits of the AWS integration.
Prerequisites
To complete this chapter, you'll need an AWS account. If you don't already have one you can use as a dev sandbox, signup up for a free AWS (pay as you go) account here.
NOTE: The AWS-specific steps of this tutorial will not incur AWS billing charges.
Installing the AWS Integration
To enable Trustle to communicate with your AWS account, we’ll need to first install the Trustle AWS Connector.
Once installed and configured, the Trustle AWS connector:
- Monitors AWS IAM and provides a full read-out on all accounts, privileges, and policies on the platform.
- Detects identity-related threats and mitigation recommendations.
- Implements AWS IAM permissions request workflows, and if enabled, the automated provisioning and deprovisioning of permissions based on the workflow state.
- Tracks account security data and usage.
- Calculates a Risk Score for each policy and account in your system.
Configuring the Trustle Connector User
The Trustle AWS Integration requires come components to communicate between Trustle and AWS:
- An AWS user named trustle-connector.
- Two managed policies attached to trustle-connector, named trustle-read and trustle-write.
- An access key pair.
The following procedure uses CloudFormation to describe and provision trustle-connector resources into your AWS environment in a safe, repeatable way.
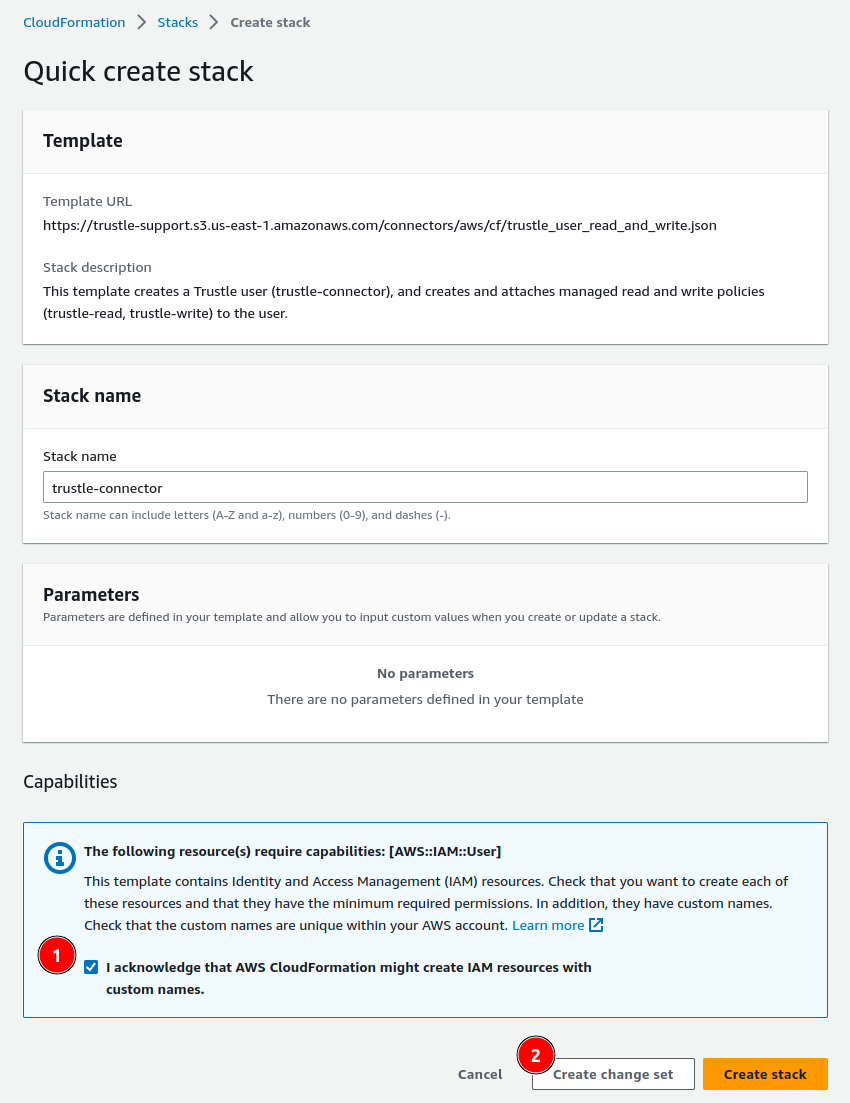
Create the IAM User, Policies, and Access
To create the user and policy via CloudFormation and the AWS CLI:
- Login to the AWS console to the console as an admin user.
- Select the region you wish to run CloudFormation from in the upper right corner of the AWS Console.
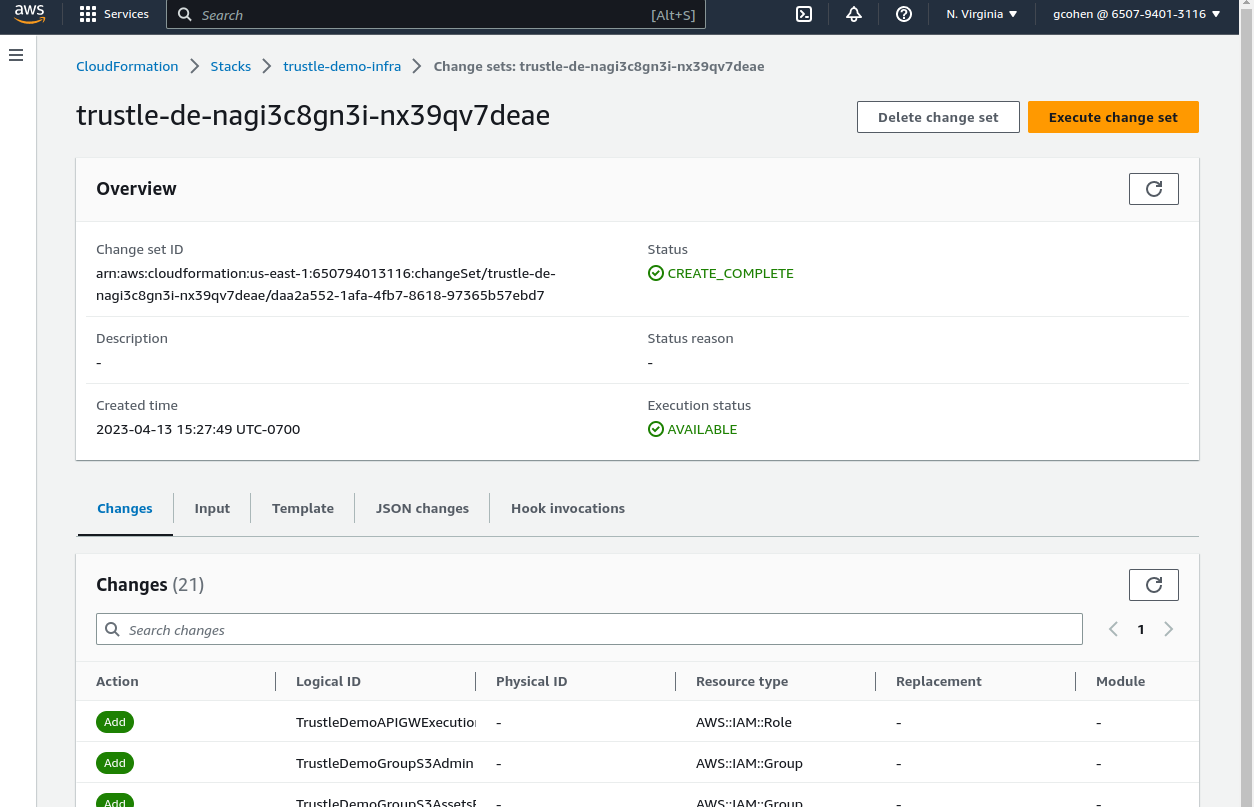
- Click this link to prepopulate the Create Stack Wizard with the trustle-connector CloudFormation template.
- Click the confirmation checkbox at the bottom of the page.
- Click Create change set.
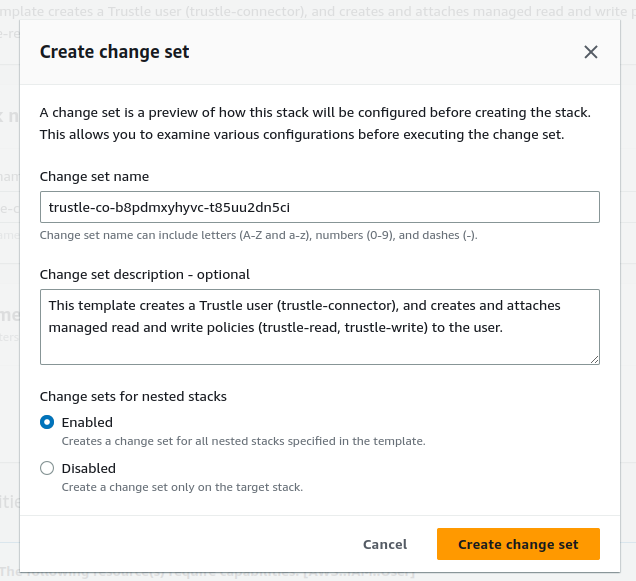
The Create Change Set dialog appears.
- Accept the defaults, and click Create change set.
To inspect the exact resources being created, click through the Template and Changes tabs.
When you are ready to create the resources, click the refresh button on the Overview panel, and then click Execute change set.
NOTE: The trustle-connector can run either in a read-only, or read/write mode. You can control Trustle read/write functionality from within the Trustle application itself (default write-disabled). If you choose, you can also disable Trustle write functionality at the IAM system-level as well by removing the trustle-write policy from the trustle-connector user’s permissions after stack creation completes.
You can always update the trustle-connector user’s permissions to include the trustle-write managed policy later on if you wish to keep it disabled at the IAM system-level while you experiment with Trustle’s read-only features.
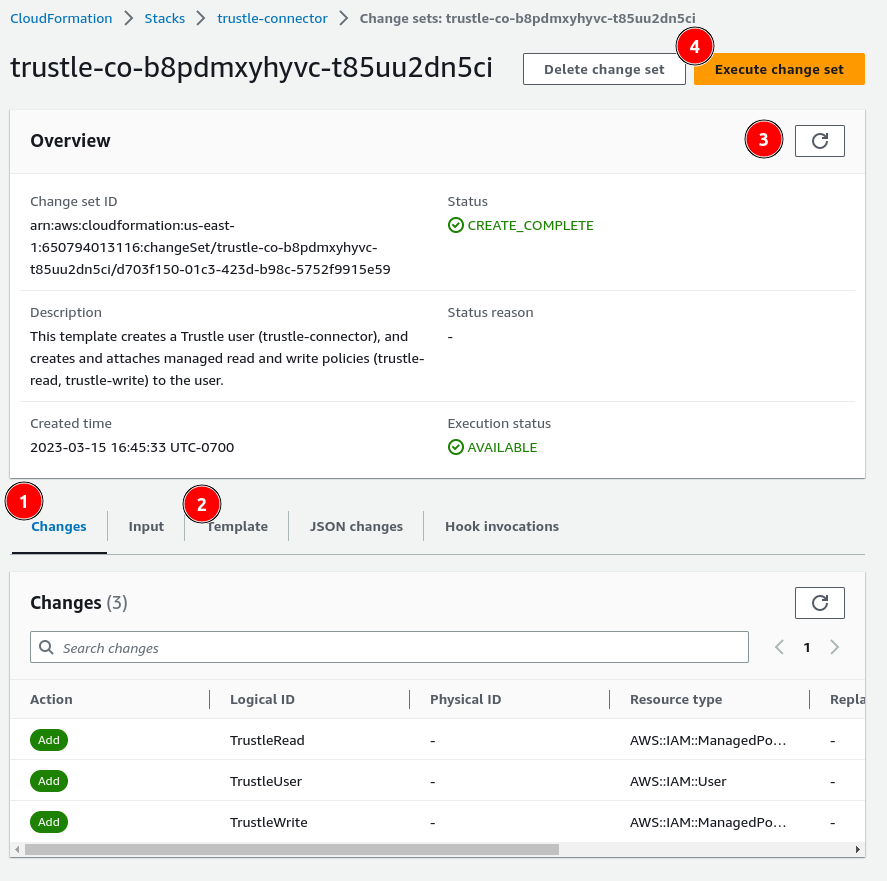
The Execute change set dialog page appears.
Accept the defaults on the dialog, and click Execute change set.
Once the stack creation is complete, you can view your newly created user and associated permissions via the IAM user detail page for trustle-connector.
Create access keys for the user with the AWS CLI via the following command (use CloudShell if you already have the required access via the console):
aws iam create-access-key --user-name trustle-connectorKeep the returned Access and the Secret keys for the next section. Follow best practices to protect the credentials you just created.
Add an AWS System to your Trustle Account
Once the user, policies, and access keys have been setup on the target AWS account, we can proceed to setup the connector on Trustle.
Login to your Trustle Org.
On the left menu, click Manage.
The Owned Resources screen appears.
Click Add System.
The system will prompt Which system would you like to add today?
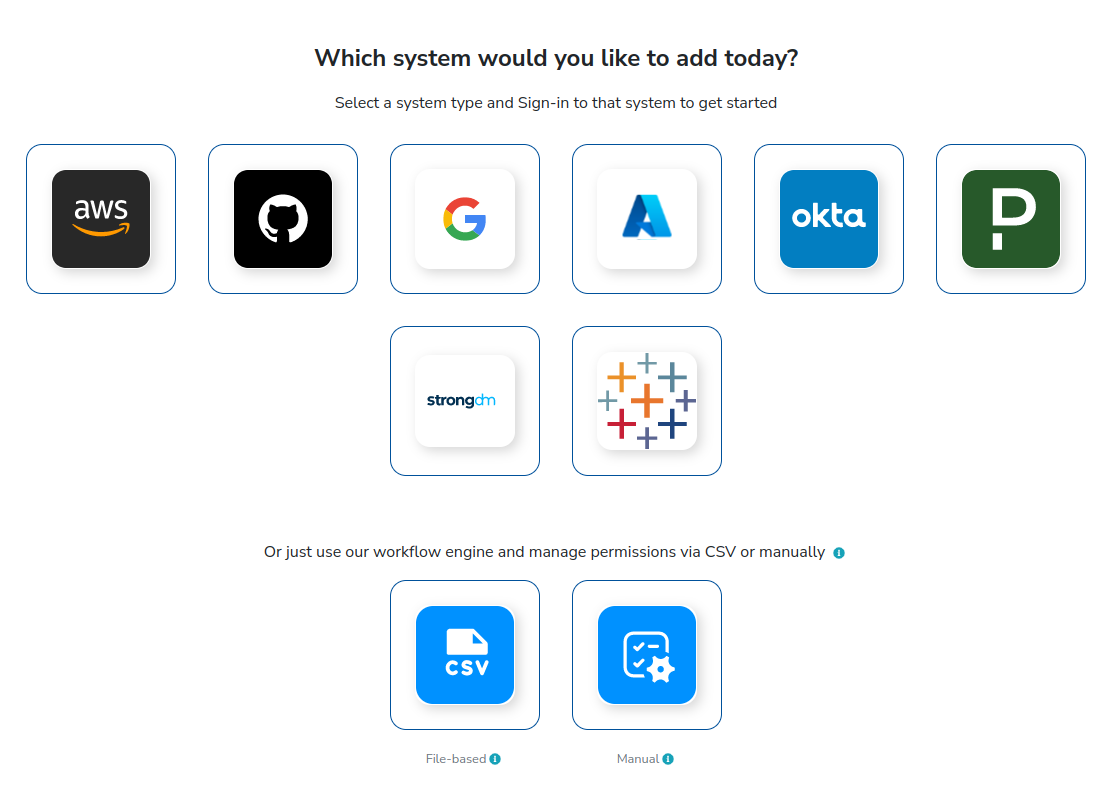
Trustle currently supports AWS, Github, Google Workspaces, Azure, Okta, Pagerduty, StrongDm, and Tableau, but we’ll use AWS for this portion of the tutorial.
Click on the AWS icon.
You are taken to the Add a new AWS System dialog.
For Name, enter aws-1, then click Save. (We’ll use aws-1 as a system reference throughout this document, but you can name it whatever you wish.)
The API Key configuration page appears.
Enter the access and secret keys you created during the AWS Trustle user setup.
By default, Trustle will prompt you to rotate your trustle-connector user access keys every 3 months.
Modify the Trustle Connector key rotation reminder value, or accept the default, then click Test Connection.
You should receive a Connected Successfully message. If you didn’t, please verify your keys, and try again.
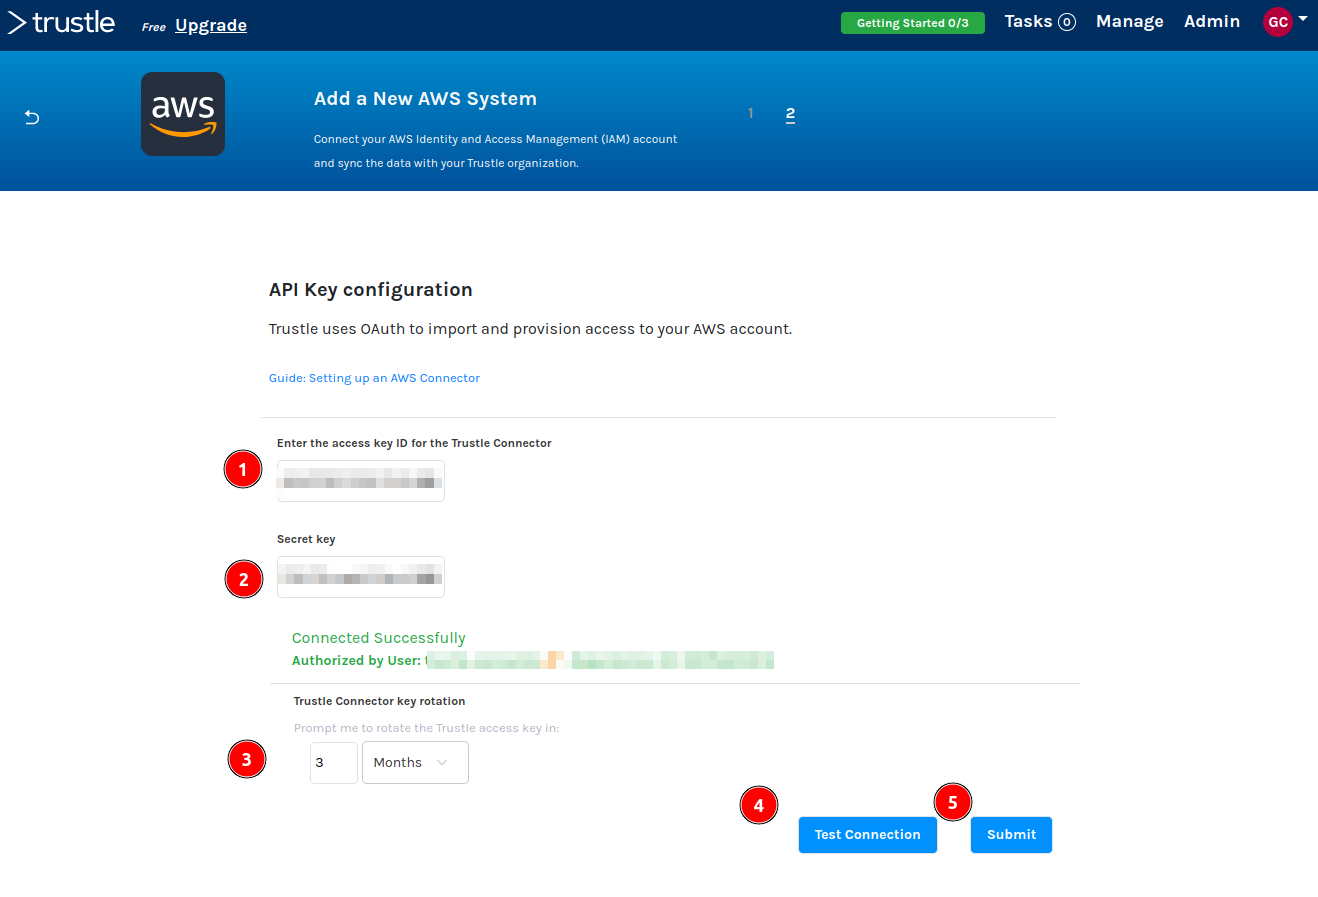
Click Submit.
Congratulations, AWS-side configuration for the Trustle AWS Integration setup is now complete! Next, we'll begin work on the Trustle-side configuration of the AWS Integration.
Vandelay Industries’ Application Architecture
Before we dive in to the final Trustle-side configuration steps, let's understand a bit more about our fictional organization, Vandelay Industries. They run a Single Page Application web app within their AWS environment. The architecture consists of Amazon CloudFront, S3, API Gateway, Lambda, and DynamoDB:
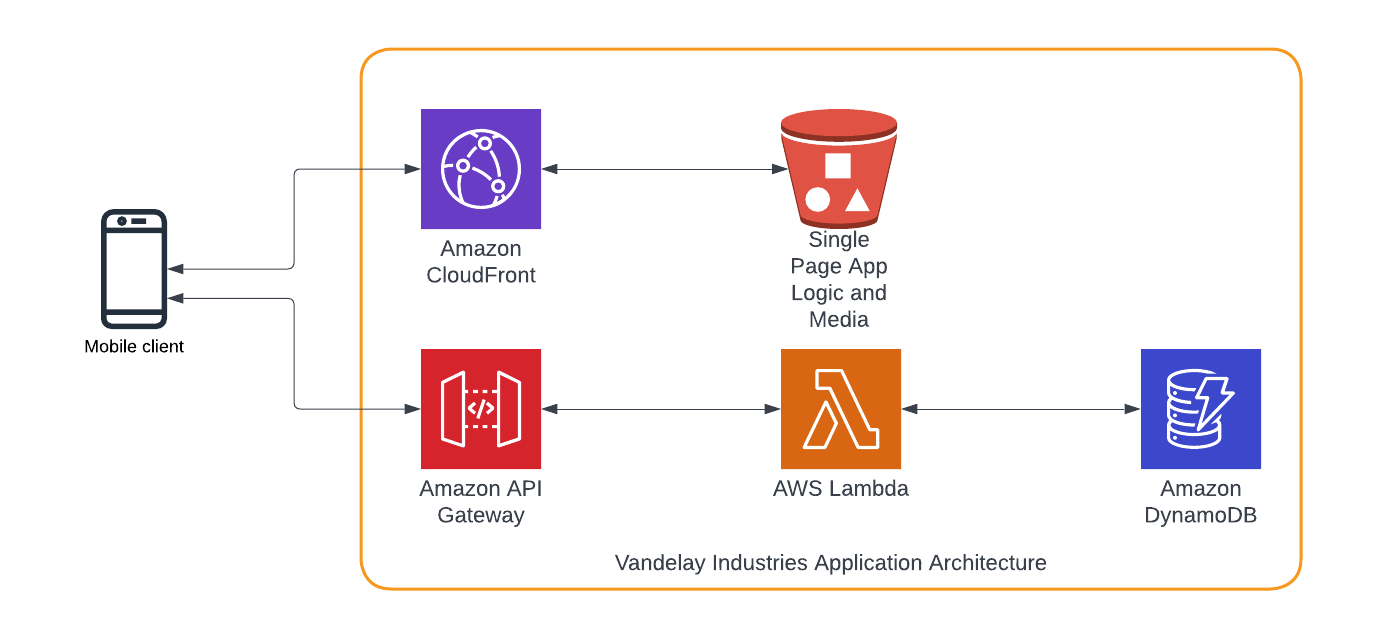
This architecture implements the following AWS users, groups, roles, and policies:
Users
Human
(trustle-demo-)
- honcho
- Alice
- Bob
- Cal
- Dina
- Ed
System
- trustle-demo-testbot (user spawned by CICD which runs integration testing scripts.)
User Groups
trustle-demo-S3Admin
- AWS Managed Policy: AmazonS3FullAccess
- Sensitivity: Highest. Anyone with this access can access confidential company and customer data.
- Used By: Alice, Cal to maintain S3.
trustle-demo-S3AssetsRead
- Customer Managed Policy: Read on /web_assets
- Sensitivity: Low. Same content available through this access is available via public website.
- Used By: Entire company to verify content/state of public web assets (but not Alice or Cal, who have S3Admin).
trustle-demo-S3AssetsReadWrite
- Customer Managed Policy: ReadWrite on /web_assets
- Sensitivity: High. Although content is publicly accessible read only, we don’t want anyone making unauthorized content available via this access right to the website or bucket.
- Used By: Honcho, Bob, Ed to update public web assets.
trustle-demo-S3CodeReadWrite
- Customer Managed Policy: Read/Write on /cgi-bin
- Sensitivity: High. This is where source code is kept, which is not open source.
- Used by: Dina, to view/update code environment.
trustle-demo-S3CustomerReadWrite
- Customer Managed Policy: Read/Write on /customer_data
- Sensitivity: Highest. Customer-confidential data is kept in this bucket. Having it leaked would put customers livelihoods at risk, and destroy public trust in Vandelay Industries.
- Used by: Bob, Honcho, Ed to update customer-specific reports.
Roles
TrustleDemoLambdaExecutionRole
- Execution Role used by Lambda
TrustleDemoAPIGWExecutionRole
- Execution Role used by API GW
TrustleDemoIntegrationTesterRole
- Role used by testbot to perform API-level integration Testing
Attached Customer Managed Policies
DynamoDBLogsReadOnly - Run ad-hoc reports from DDB
- Sensitivity: High. Anyone with this access can read customer-confidential data.
- Used by: Ed.
Attached AWS Managed Policies
CloudFrontFullAccess - CloudFront configuration
- Sensitivity: High. We don’t want the wrong person getting a hold of our CDN configuration.
- Used by: Cal.
To follow along in the next part of the tutorial, we’ll require the forementioned AWS components installed into the same AWS account we installed the connector to previously.
NOTE: Only IAM objects (no keys) are created with the following CloudFormation template – the actual application infrastructure is only presented as a diagram for context, and is not created by the CloudFormation template. You’ll be able to verify what is being installed before giving final approval to install.
To install the above referenced users, roles, groups, and policies:
Click here to launch the demo infrastructure CloudFormation template.
The Quick create stack page appears.
Check the I acknowledge that AWS CloudFormation might create IAM resources with custom names Message, then click Create Change set.
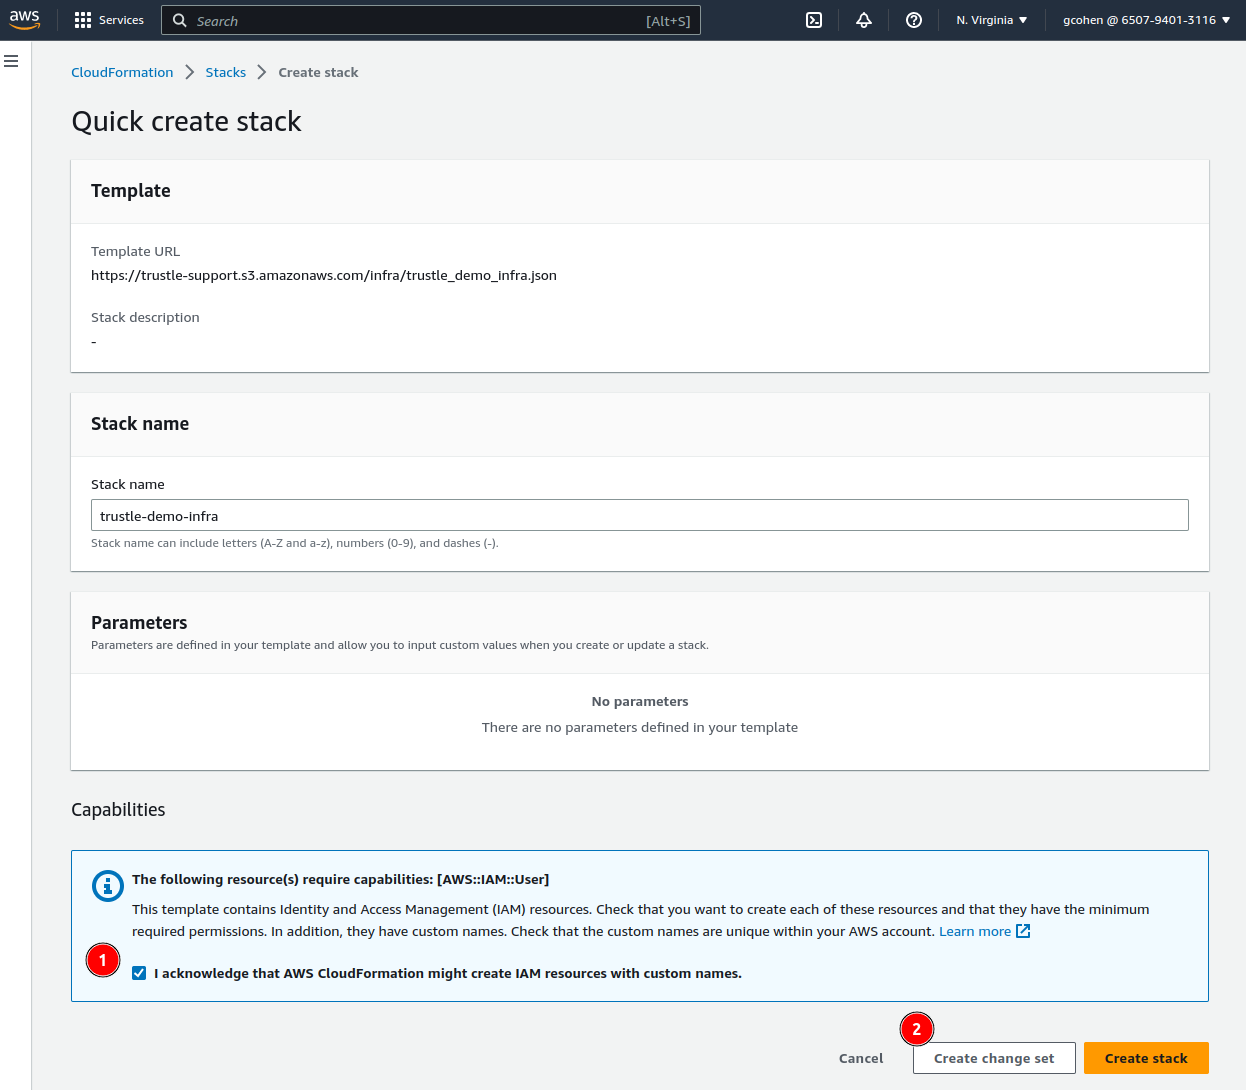
Click Create change set again in the dialog that appears.
The Change Set page appears.
To inspect the exact resources being created, click through the Template and Changes tabs.
When you are ready to create the resources, click the refresh button on the Overview panel, and then click Execute change set.
The Execute change set dialog page appears.
Accept the defaults on the dialog, and click Execute change set.
Once the stack creation is complete, you can view your newly created policies, roles, and users via the IAM page, and enter trustle for the filter.
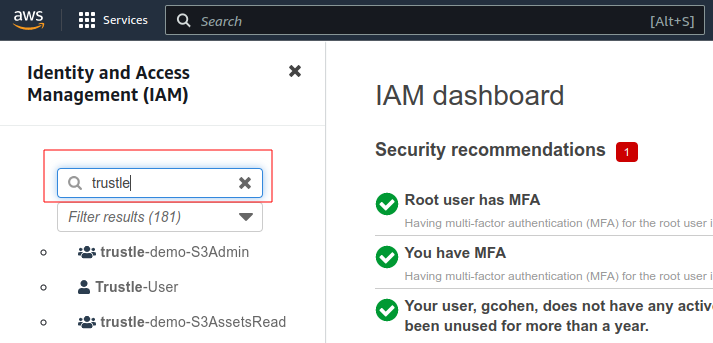
Congrats, you’ve successfully installed the AWS-side sample infrastructure components!
Using Trustle with AWS
With Trustle installed with the AWS Connector, and our example AWS account populated with Vandelay Industries’ IAM components, let’s walk through the AWS Connector’s settings.
As Organization Owner (the email you created Trustle with), login to Trustle.
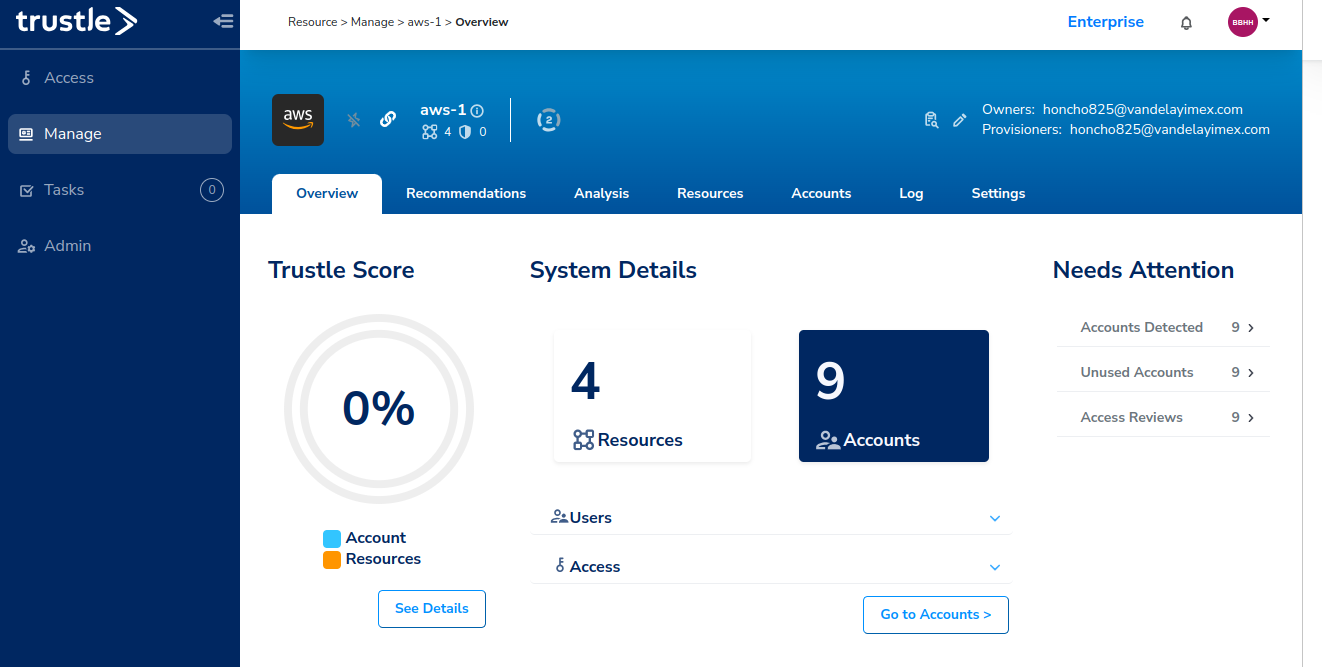
Click the Manage menu item, then select aws-1.
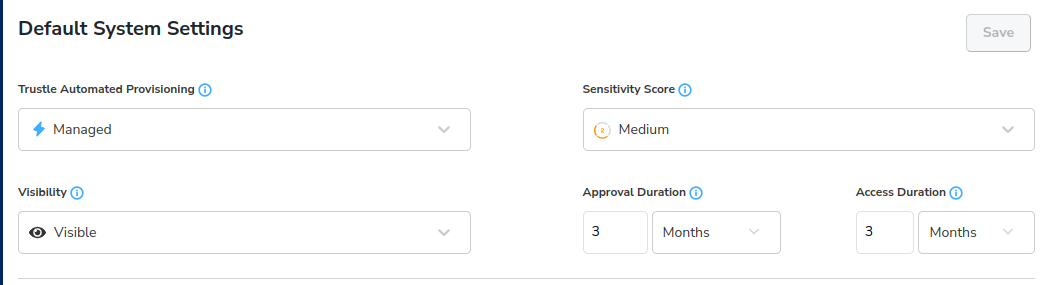
Select Settings, System Settings Tab, and set Automated Provisioning and Visibility to Managed and Visible, then click Save.
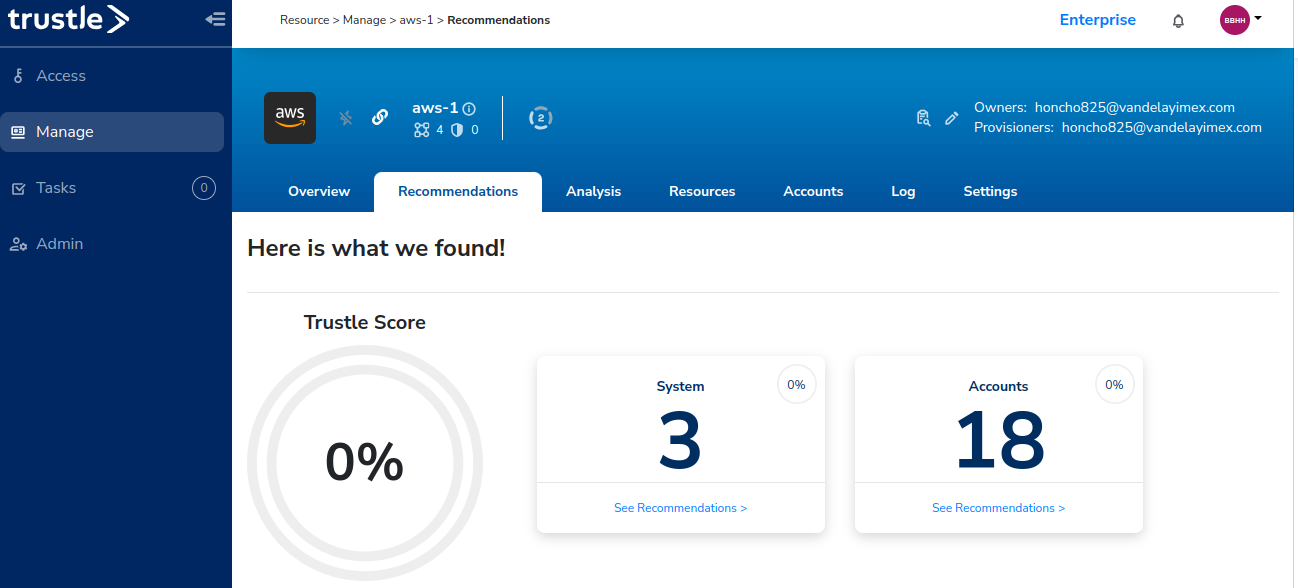
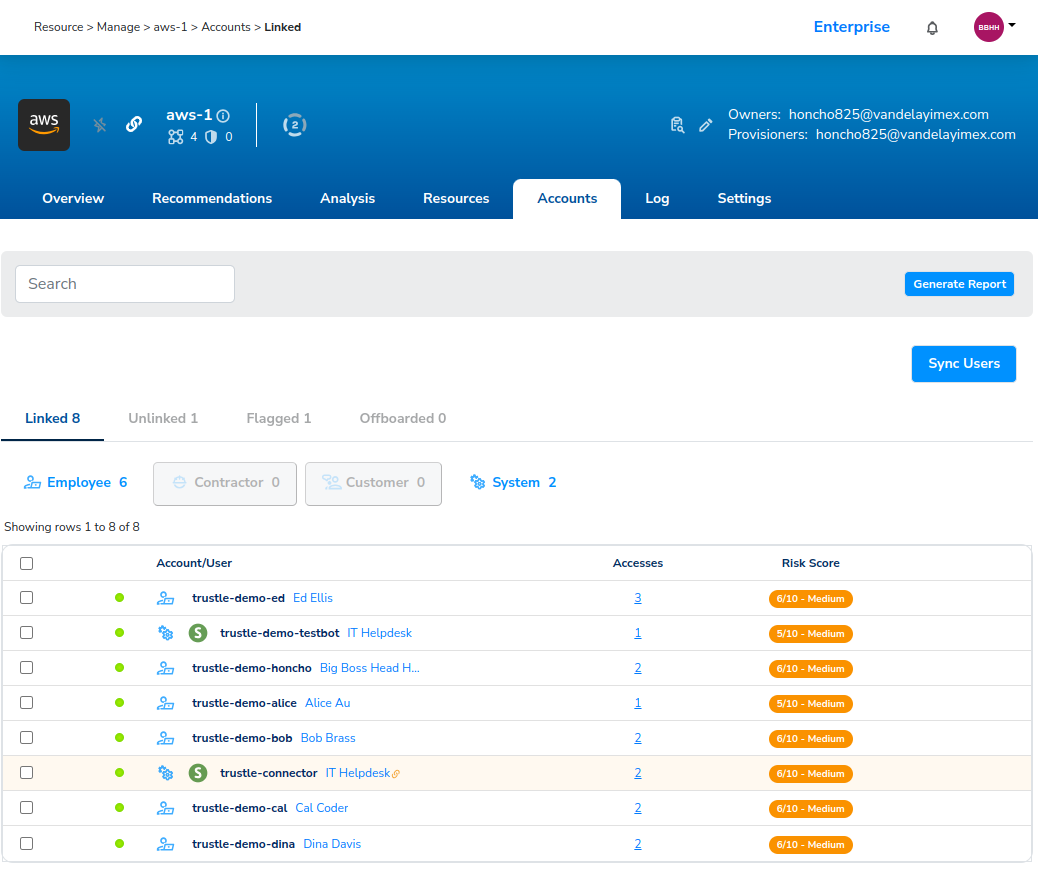
Next, from the Overview tab, we can see it shows us the connector has detected nine AWS accounts (users), and supports import of four resources (groups, inline/managed policies, and roles.)
Click the Recommendations tab.
Here we see some system, and account-based threat detections and recommendations provided by Trustle.
Click on System to drill down on system-related threat detections.
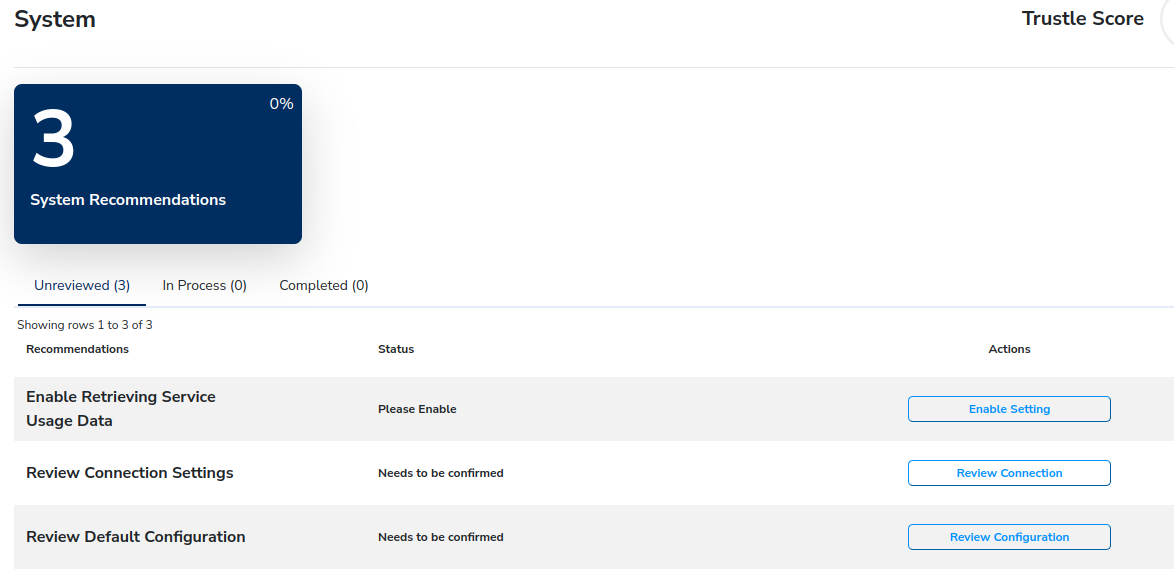
For the service usage data configuration detection action, click Enable Setting for Enable Retrieving Service Usage Data.
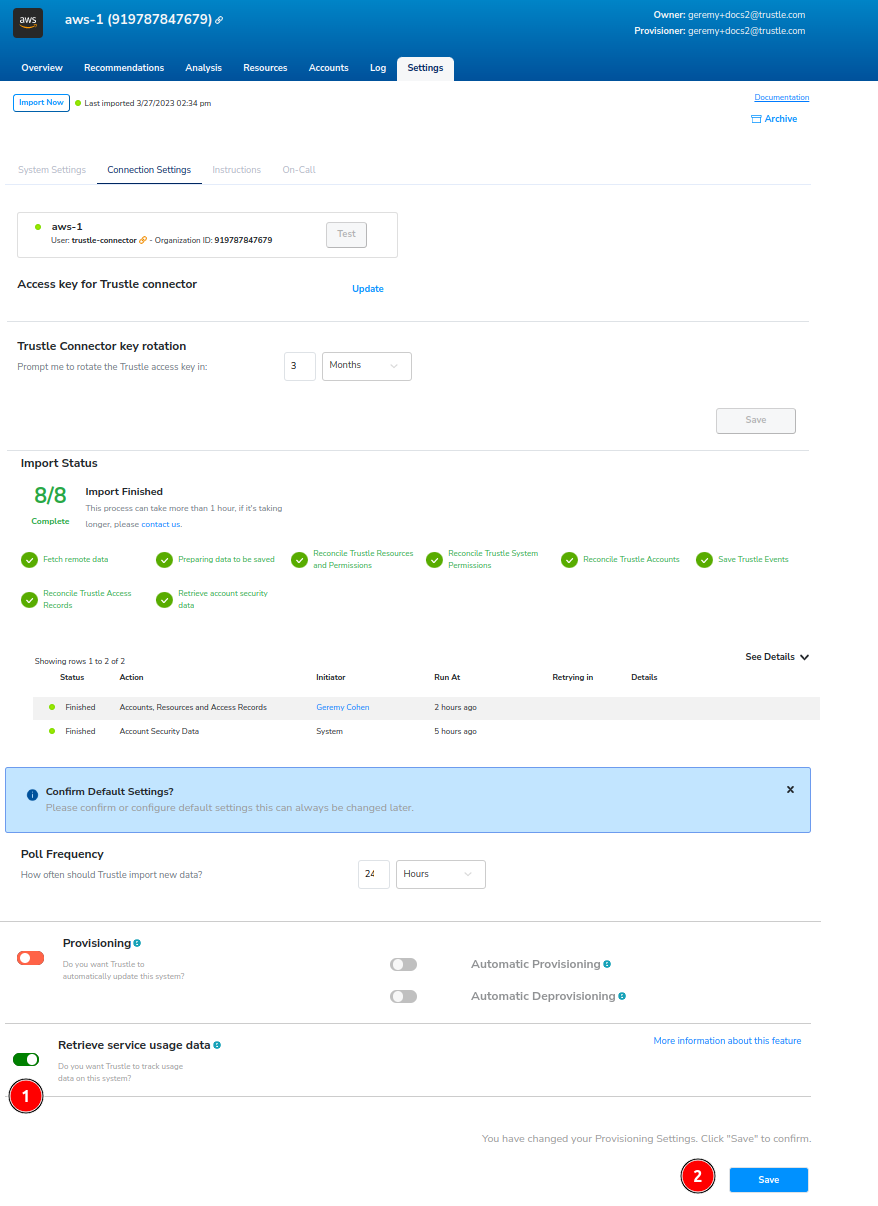
This will allow Trustle to report on resource usage. You will be taken to the AWS Settings -> Connection Settings tab.
From the Settings tab, Click Import Now.

View the Import Status lower in the page, and make sure that the import has completed all steps before proceeding.
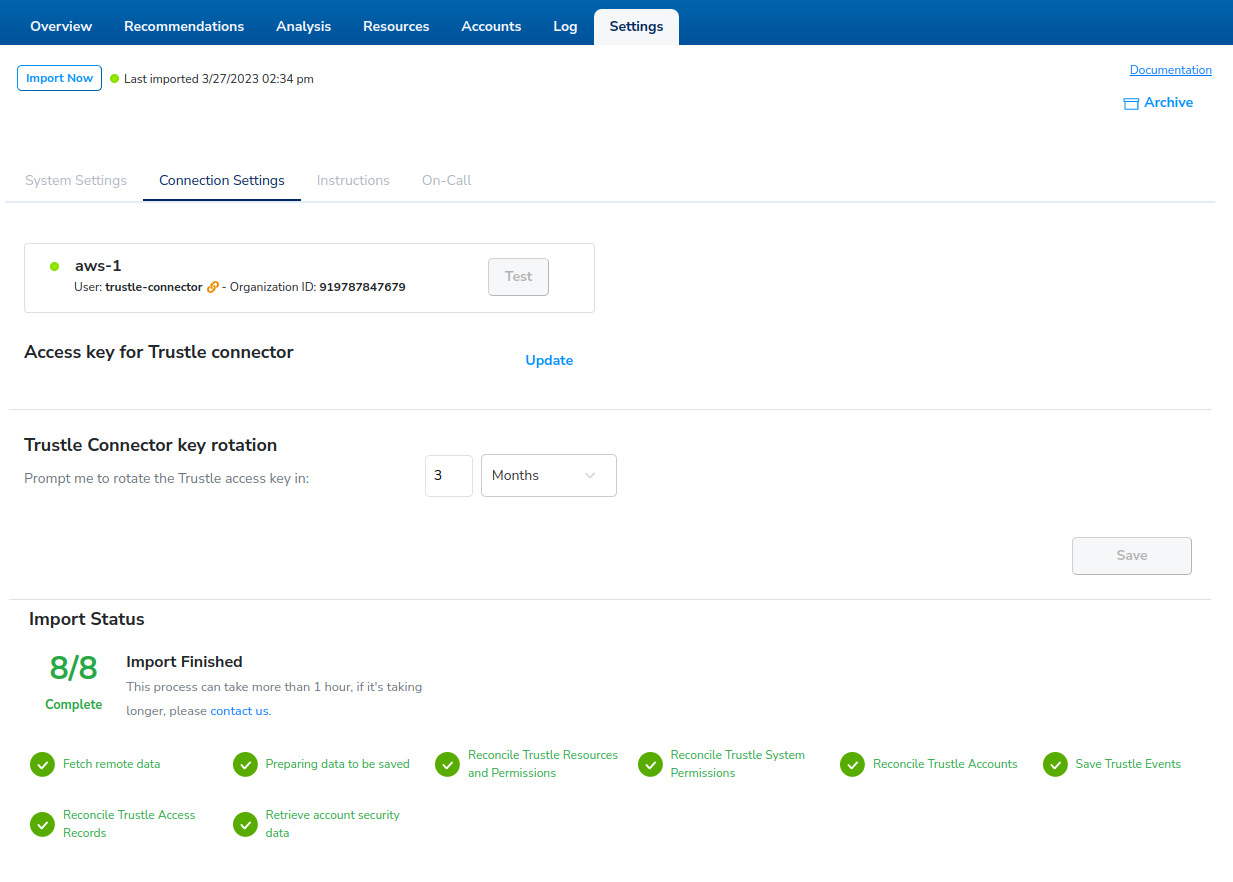
Scroll to the bottom.
Click Retrieve service usage data and then click Save.
Click back in your browser to return to the Systems Recommendations page.
Click Review Connection for Review Connection Settings.
You will be taken to the AWS Settings -> Connection Settings tab. This page lets us configure the connector, view connector log data. In addition, it lets us set provisioning options, which are currently disabled.
Click the X to close the Confirm Default Settings after you’ve reviewed the page (but don’t make any changes to this page yet.)

Click back in your browser to return to the Systems Recommendations page.
Click Review Configuration for Review Default Configuration.
You will be taken to the AWS Settings -> System Settings tab. This page lets us configure owners, provisioners, default sensitivity, visibility, and duration periods.
In addition, it lets us configure management and deprovisioning settings, which are currently disabled.
Click the X to close the Confirm Default Settings after you’ve reviewed the page (but don’t make any changes to this page yet.)
Click back in your browser to return to the Systems Recommendations page.
You should see there are zero recommendations remaining.
Click back in your browser to return to the Main Recommendations page.
Account Recommendations
From the Recommendations page
click Accounts to view Account recommendations.
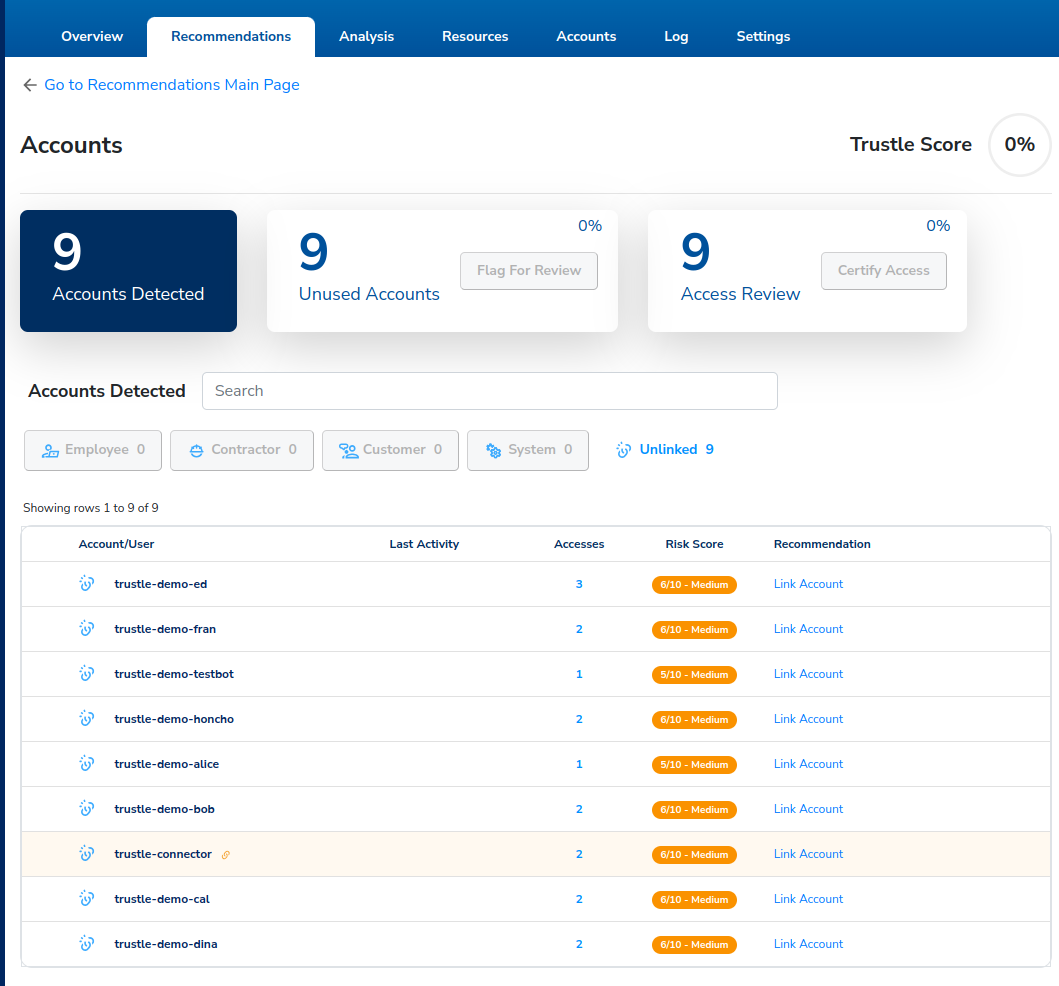
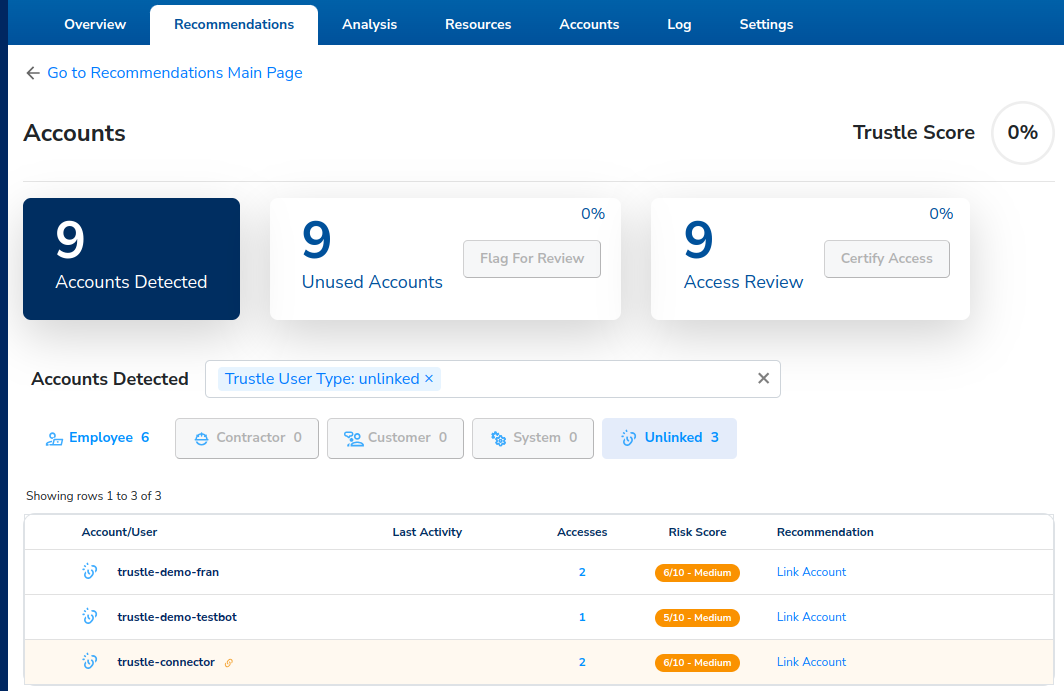
The Account Recommendations page is displayed with three filters. We’ll begin with the first filter, Accounts Detected.
Linking Users
- Click on the Accounts Detected filter.
Our goal is to link each of these AWS accounts to its corresponding Trustle user to establish ownership. Let’s do that with your account, (the head honcho) first.
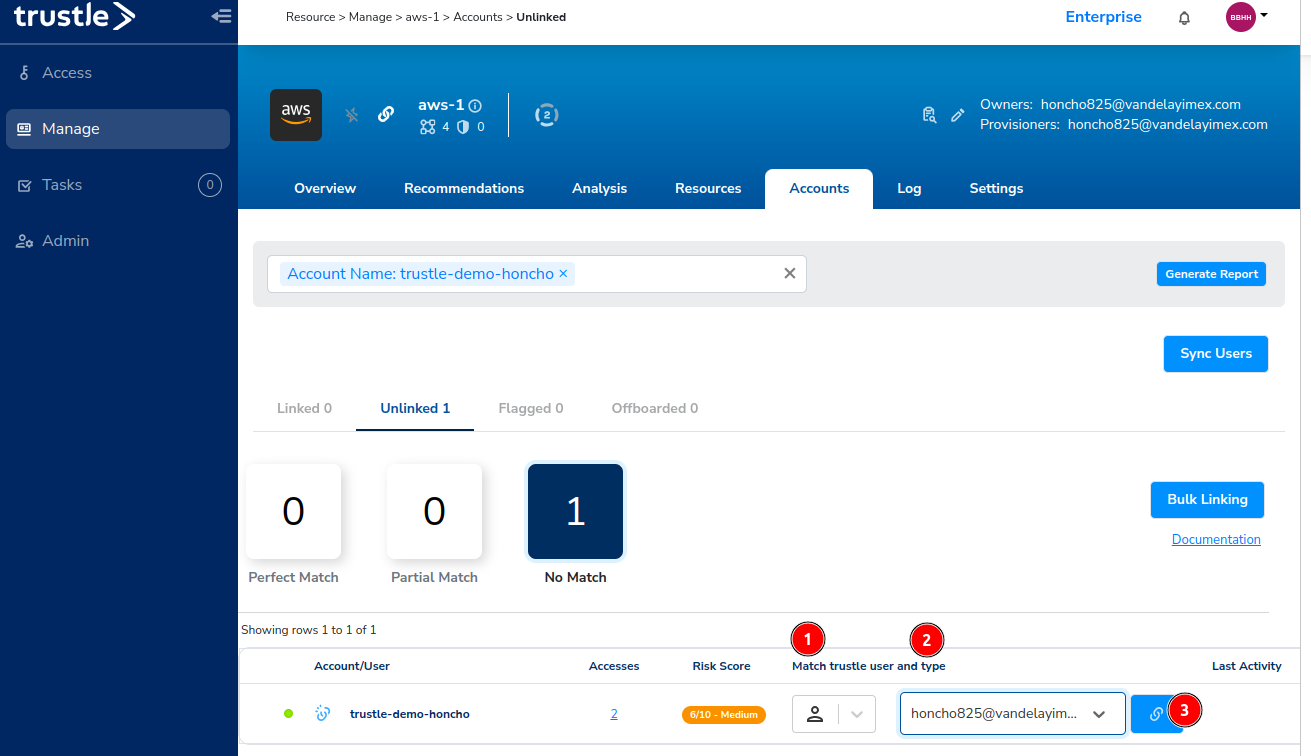
For the user trustle-demo-honcho, click Link Account.
You are taken to the AWS accounts page, with an Account Name filter set to only display the user trustle-demo-honcho.
For Type, select Personal (Person Icon), and for Trustle User, select Honcho's email, then click the Link User button.
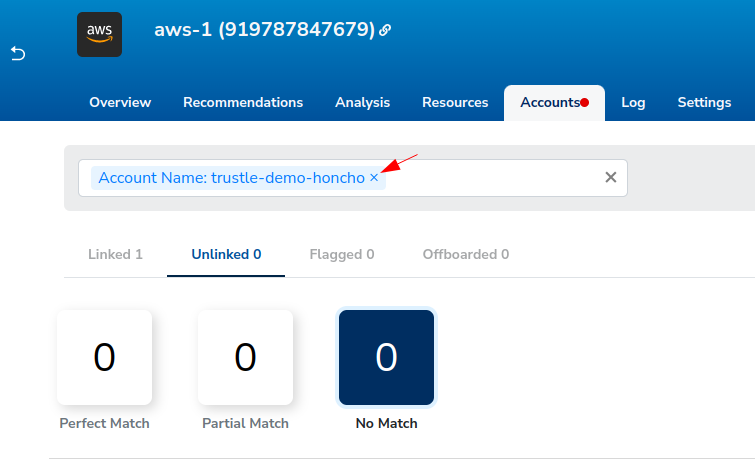
While we’re here on the AWS Accounts page, click on the x next to the Account Name: trustle-demo-honcho to remove the account name filter.
Trustle will automatically try to suggest who the accounts belong to by matching Trustle User name to Account name. We can see all nine of the accounts are not matching in any way between their Trustle and AWS name counterparts, so we’ll begin our linking work under the No Match filter.
Click No Match.
The remaining eight unlinked accounts should appear.
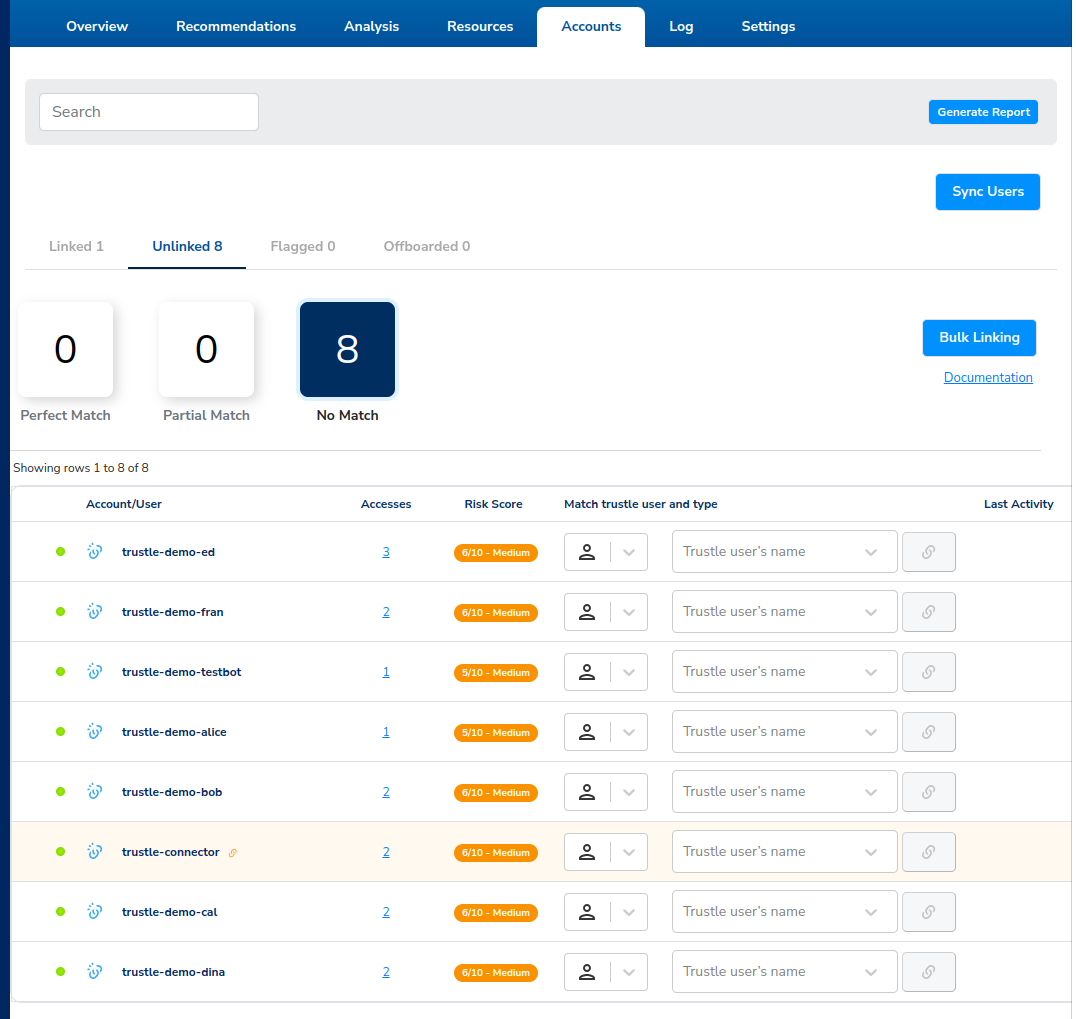
- Continue the linking process, using the Personal Account type (and the associated email) for the following users:
- Alice
- Bob
- Cal
- Dina
- Ed
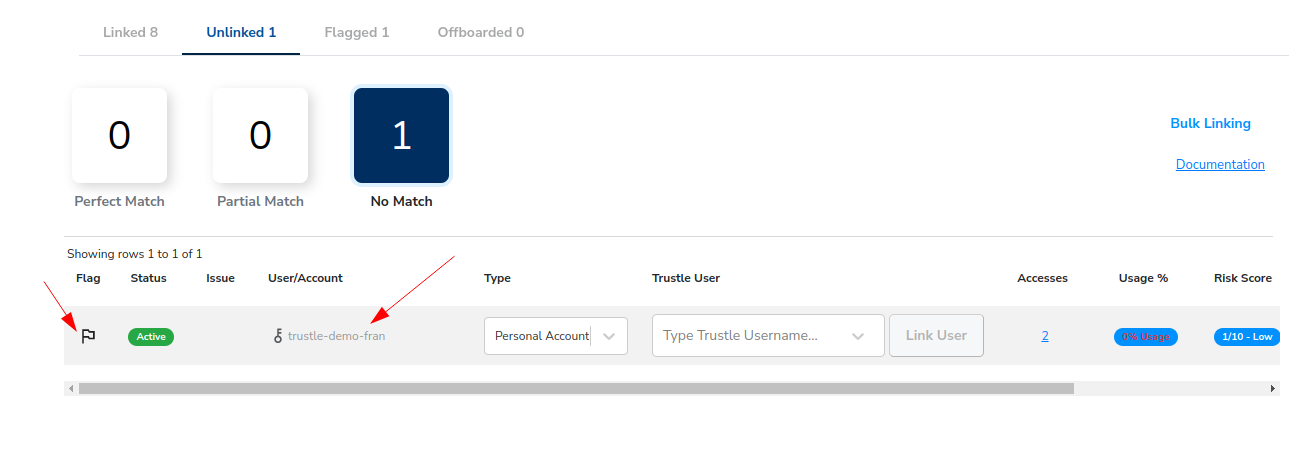
We’re now left with three unlinked users here on the Accounts page:
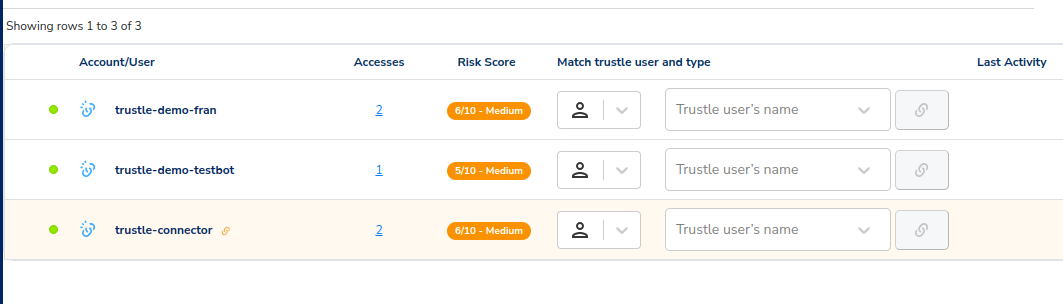
Lets return to the Accounts Recommendations page to finish processing them.
- Click Recommendations, then Account.
- Click the Unlinked filter.
We see the three accounts that remain unlinked.
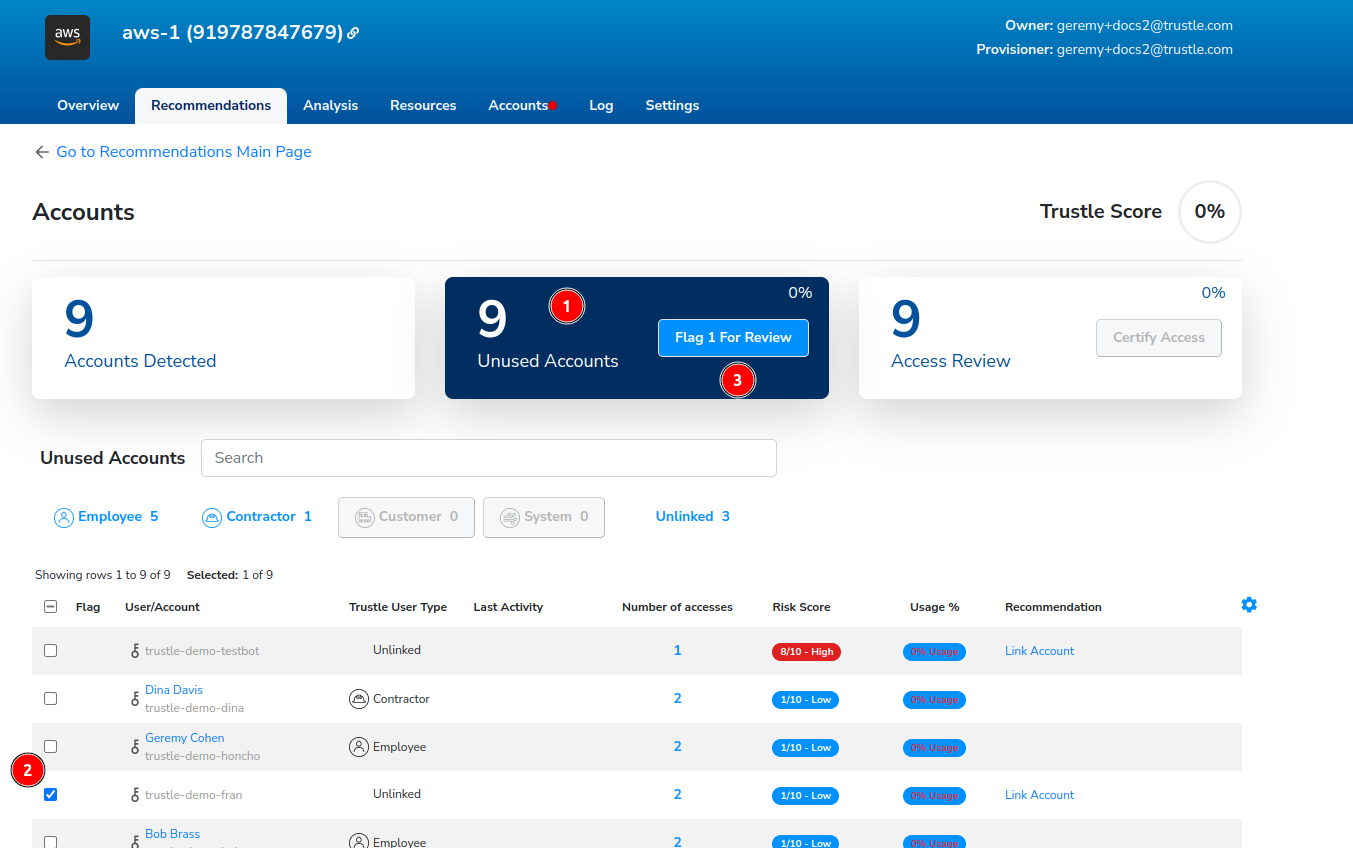
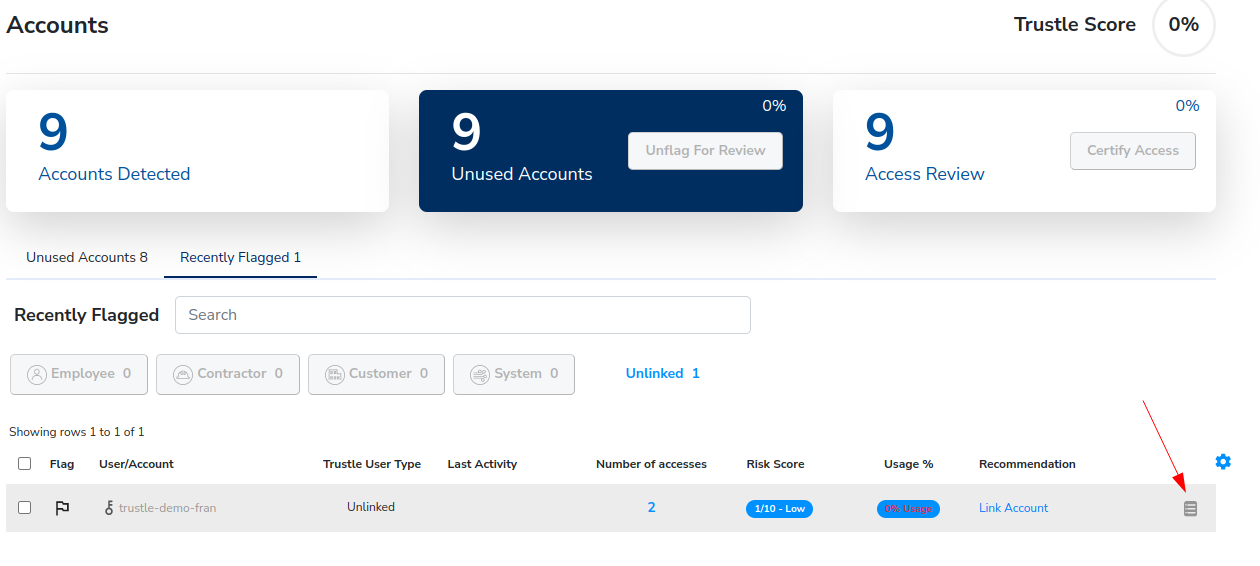
Let’s start with trustle-demo-fran. Fran left Vandelay Industries a few months back, but apparently, we missed deleting her account. We’ll flag this account to make sure we followup later to offboard it.
Flagging Accounts for Followup
Click the Unused Accounts filter.
Select trustle-demo-fran.
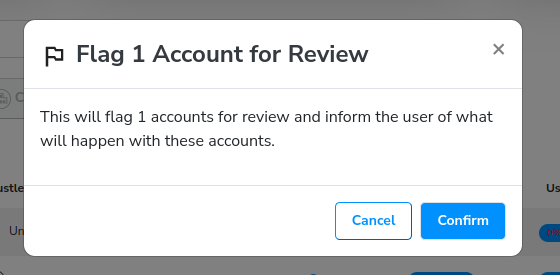
Click Flag 1 For Review.
Confirm the Flag operation when prompted, then click Go back to recommendations.
We can see the user is Flagged, under the Recently Flagged tab.
Click the Recently Flagged tab.
Click the Details icon at the end of trustle-demo-fran’s row.
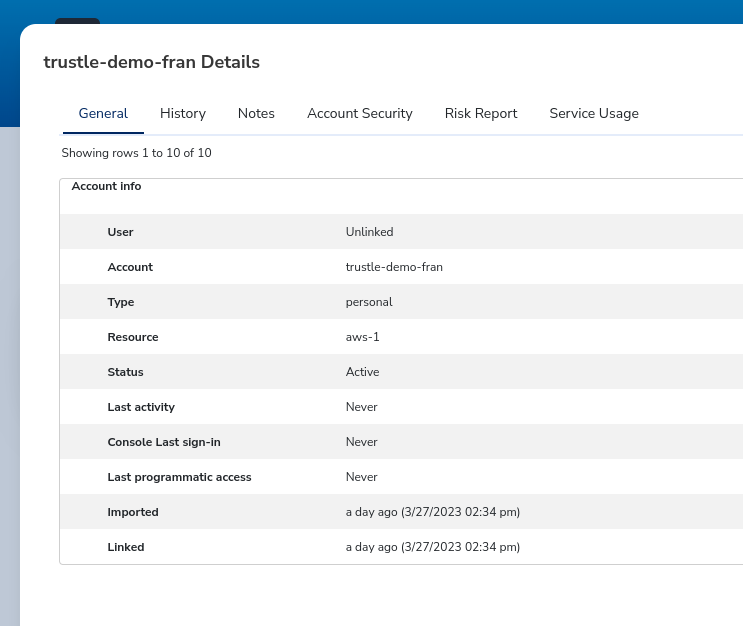
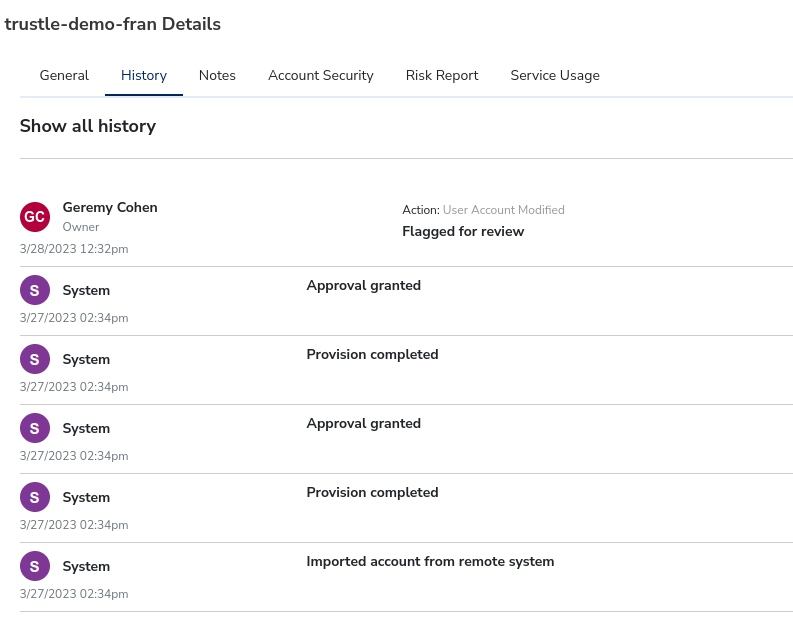
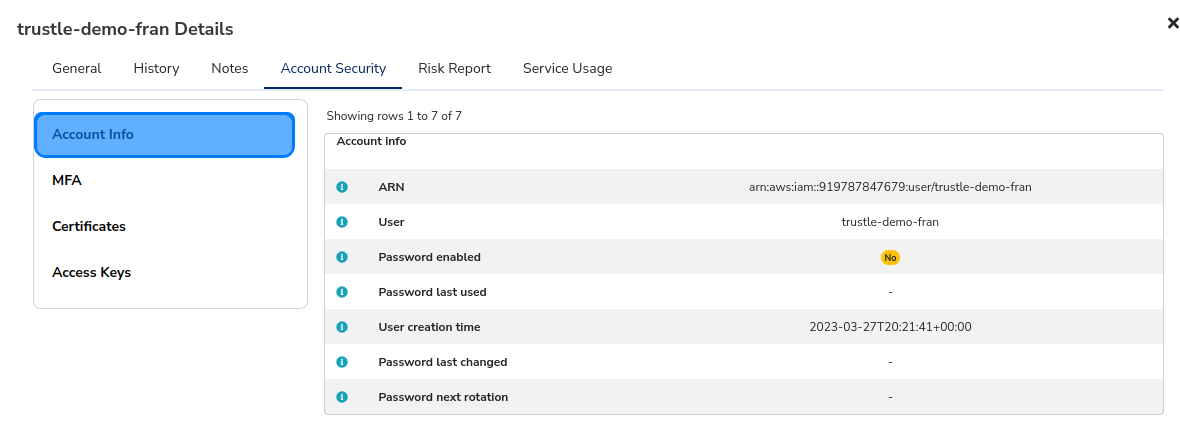
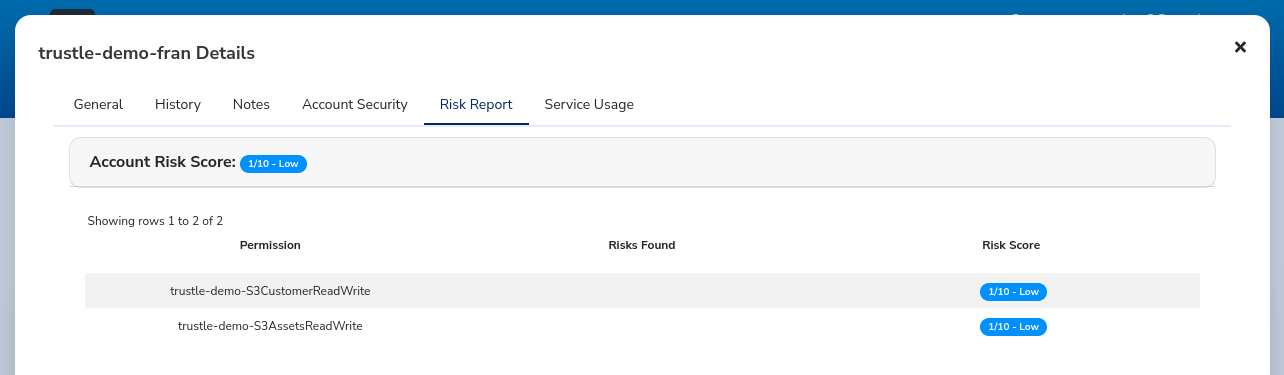
Trustle-demo-fran’s details open. Here we can review her general info, log history, notes, account security, risk report, and service usage data.
The General tab shows her general AWS account info.
The History tab shows a log of each operation Trustle has performed against this account.
The Account Security tab shows Account metadata, MFA settings, Cert, and Access Key data.
The Risk Report shows us the Account’s Risk Score, based on its permissions.
Service Usage shows access history to the service’s enabled by this account’s permissions.

Notes allows us to add comments specific to the account. Since we flagged it, let’s add a note on why we did that.
Click Notes, then Add Note.
Enter “Fran left the company a while back, can we please delete this account?”
Click Save.
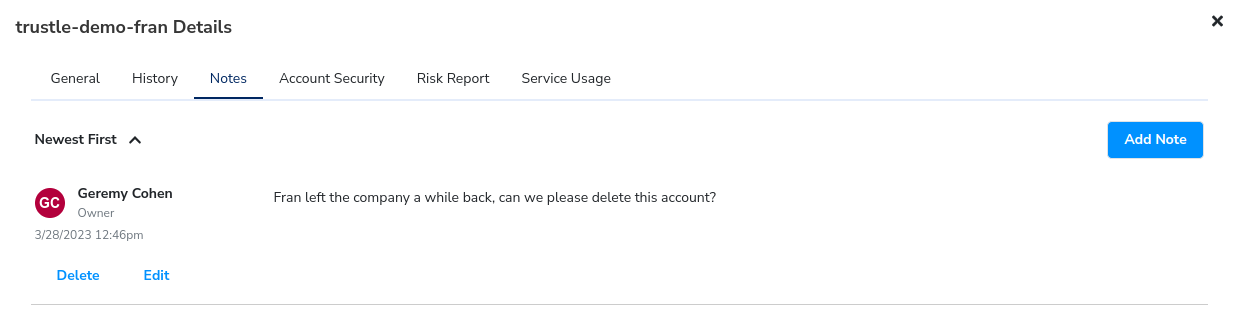
We’ve left a note to add context for this account for when we perform a review of all flagged accounts later in the tutorial.
Click the X in the upper corner to close the details tab.
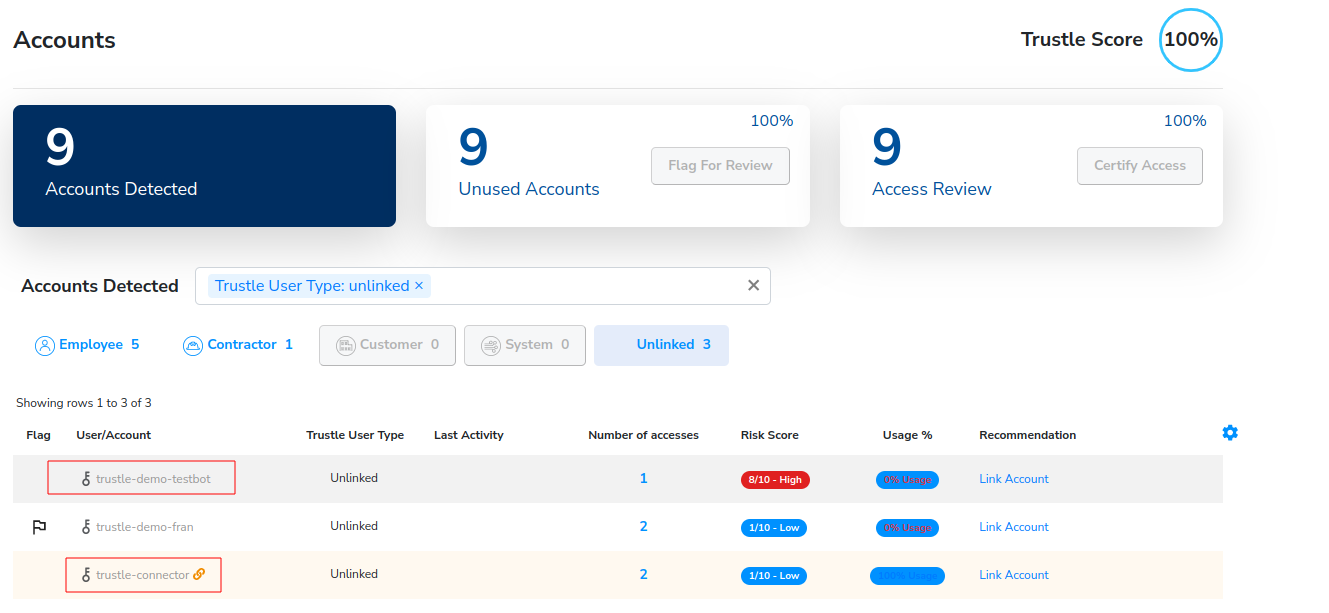
We have two remaining Unflagged, Unlinked Accounts, trustle-demo-testbot, and trustle-connector.
They are valid, but are not associated directly with any one specific person in our Organization, they are owned and maintained by IT.
Lets next create an IT System user, and then link these accounts to it.
Creating System Users
Previously we had imported our users in via Okta. Trustle also enables you to add Trustle Users separate of any IDP authority, so you can track all your users, regardless of where they are defined.
- Click Admin -> Users.
- Click Add User.
- Enter the following information:
- First, Last name: IT Helpdesk
- Title: IT Helpdesk
- Email: Use a valid email you can reply to
- Trustle User Type: System
- Manager: Cal Coder
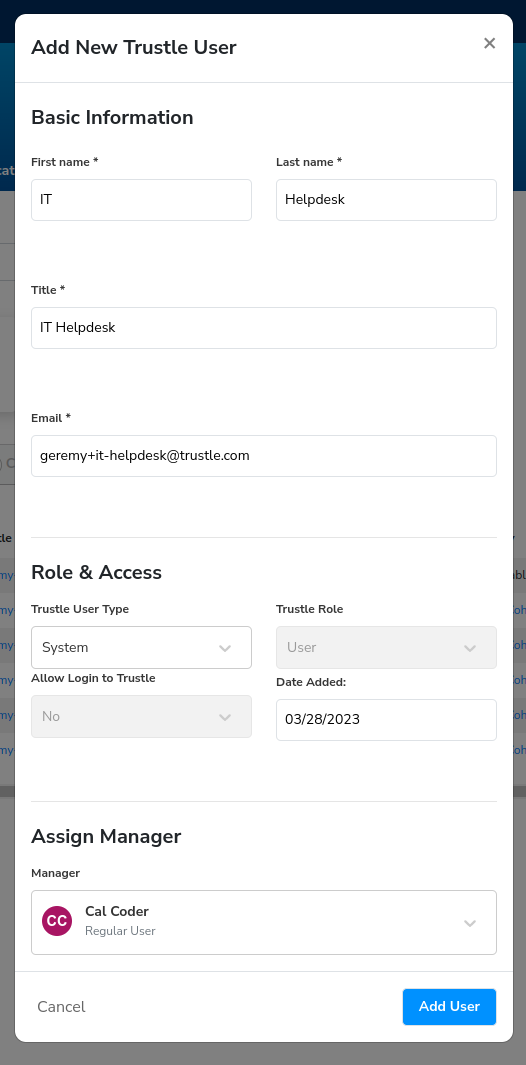
Click Add User.
With a System User created, lets now go back and link the remaining unlinked accounts to this new System user.
Click Manage -> aws-1 -> Accounts -> Unlinked.
For trustle-demo-testbot, and trustle-demo-connector:
For Type, Select Service Account (S icon).
For Trustle User, Select IT Helpdesk's email
Click the Link User button.
Do the same for Trustle Connector.
You’ve now successfully linked all active AWS accounts in your organization.
If you click the Linked filter, you can see everyone who is accounted for:
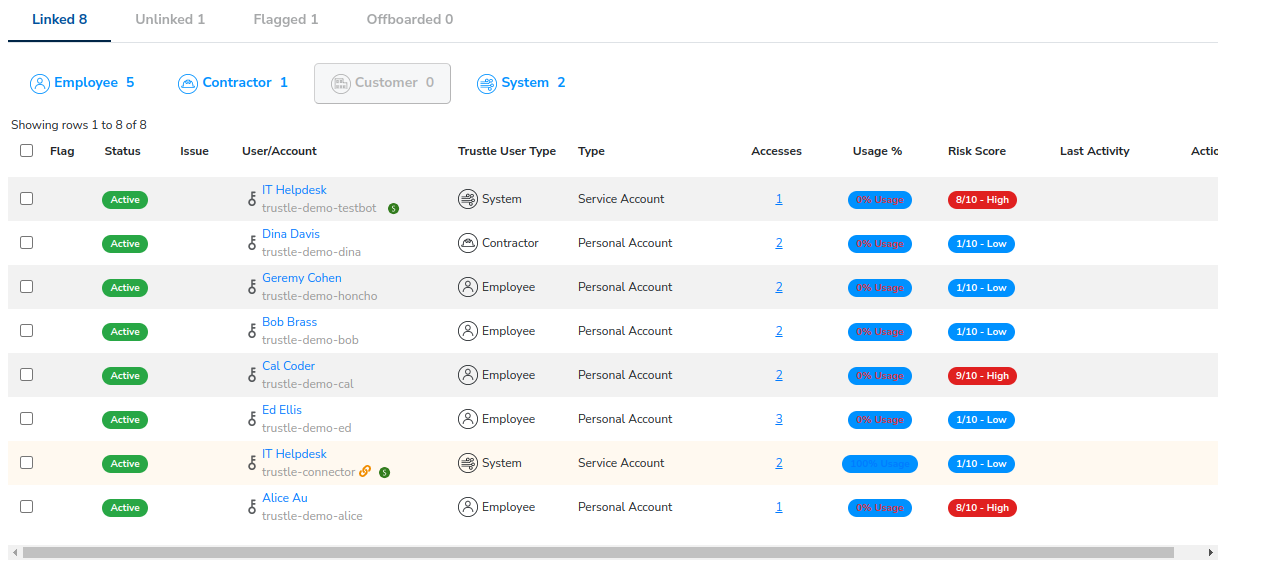
If you click the Unlinked and Flagged filter, we can see that the only person not accounted for is Fran’s old account, which we’ll need to followup and remove from AWS.
Access Review
So far we’ve linked accounts, and found one to flag for followup later. For the remaining non-flagged, and linked accounts, lets review their resource access (Accesses), Risk, and Usage.
There are two ways to view access:
By Trustle User
By AWS Resource
By AWS Resource, we can view access by AWS:
Account
Group
[AWS and Customer] Managed Policy
Review Access by Trustle User
To review access by Trustle User:
- Click Manage -> aws-1-> Accounts.
- Select a user, for example, Bob Brass
The Trustle User (Bob Brass) detail page opens. When we click Expand all, we see his permissions.
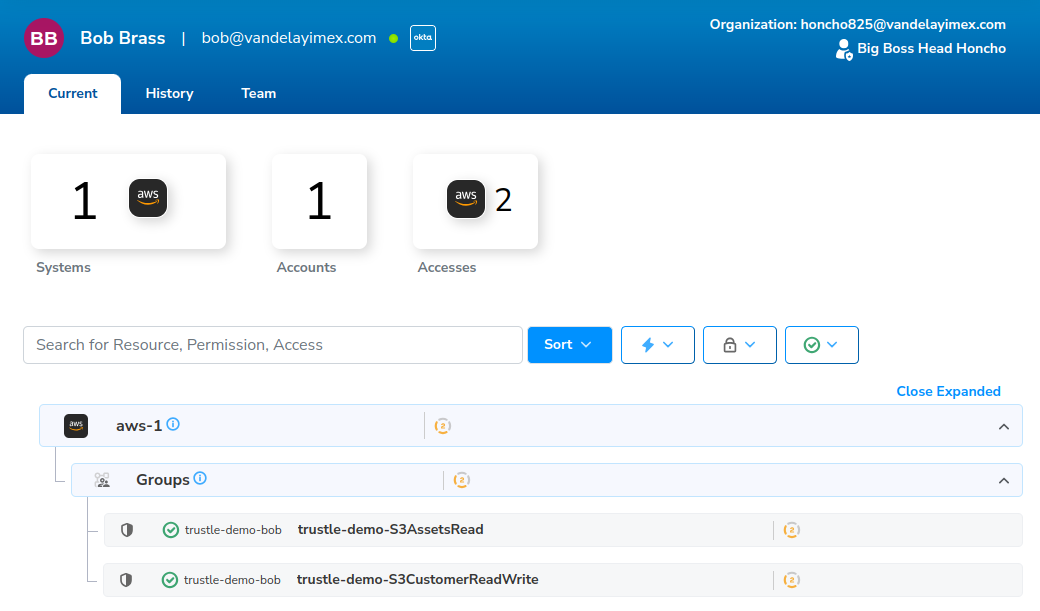
This screen is depicting that Bob has two access permissions (S3AssetsRead, S3CustomerReadWrite), to one system (aws-1), via one account (trustle-demo-bob).
The green checkmark

indicates that the permission has been provisioned.
Next to the provisioned icon, we can see that the AWS-specific user this provision is associated with is trustle-demo-bob. (If Bob was linked to more than one AWS User, and more than one AWS user had access to this group, we’d see that here as well.)
The circle with the number two around it

indicates that this permission has a default Trustle Sensitivity of “Sensitivity 2”.
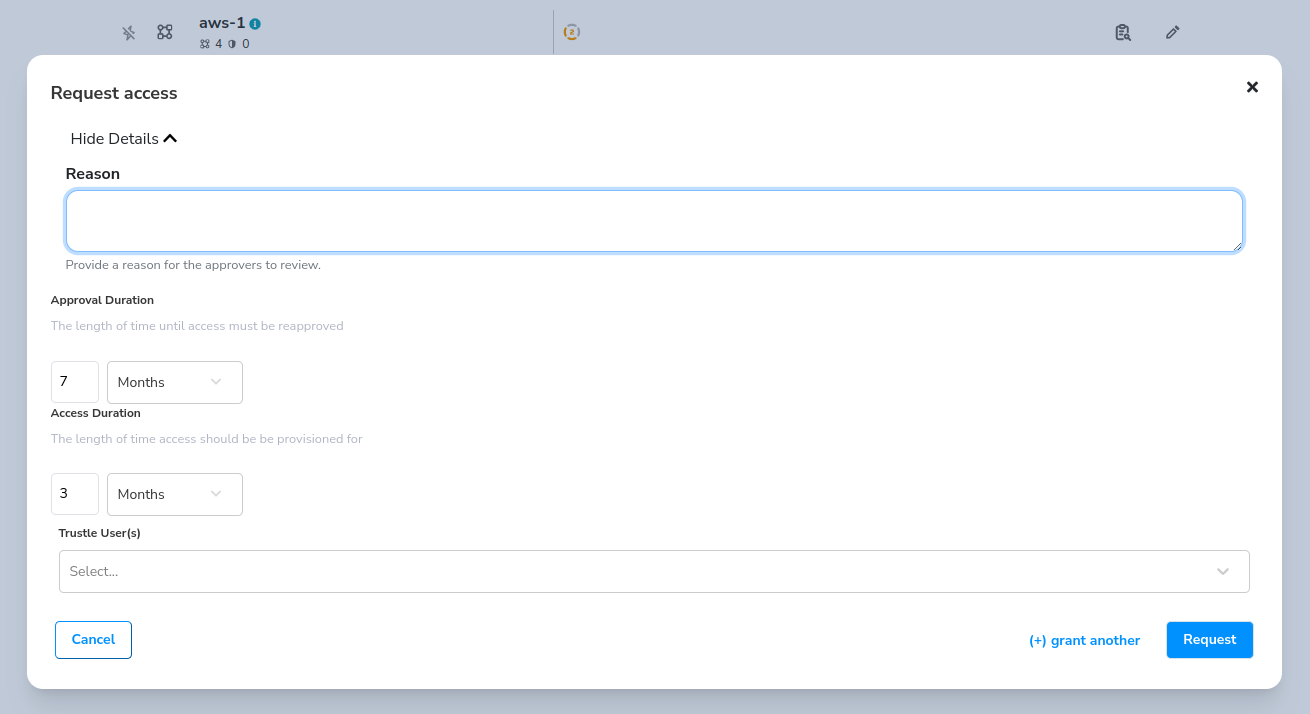
If we also wanted to request any of these group permissions for ourselves or others, we could do so via the Request Access icons

towards the end of the row.

Review Access by AWS Resource
In the last example, we reviewed access by Trustle User Bob. We can also review access by AWS Resource. To review access by AWS Resource:
- Click Manage -> aws-1-> Resources.
- Click on a resource, for example, Groups -> S3CustomerReadWrite.
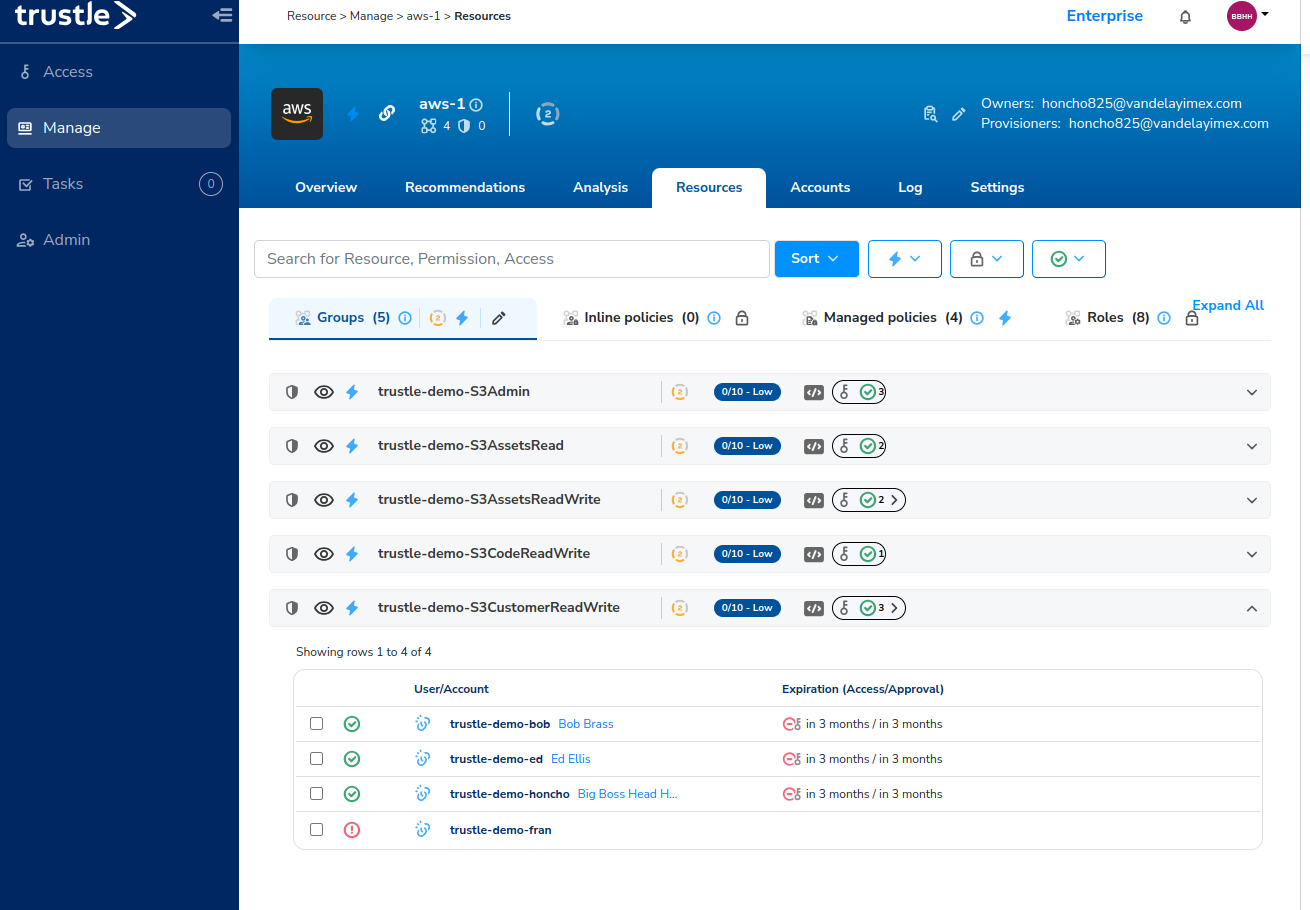
Here we can see all accounts, (and the Trustle users they are linked to) which have access to the AWS S3CustomerReadWrite Group access permission.
When viewing permissions access by resource, you can view resource details to get additional information.
The circle with the number two around it
(2) indicates that this permission has a default Trustle Sensitivity of “Sensitivity 2”.
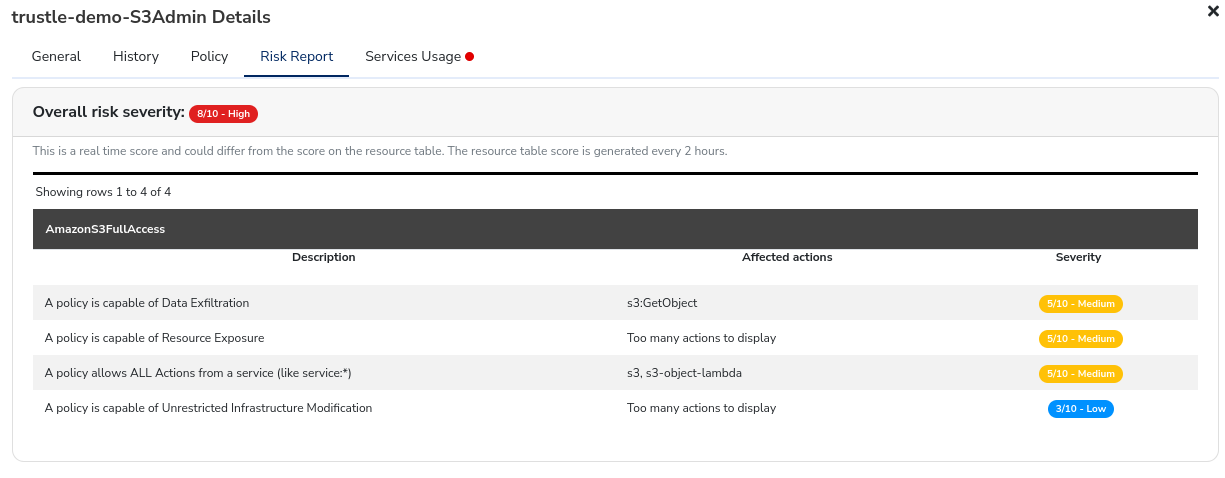
The Risk Score is a score between zero and ten which indicates the capabilities and associated security risks around an access permission. If we click on the Risk Report

icon, that permission’s details page will open to the Risk Report tab where we can find more data on a permission.
Try clicking around from low to high scores to see some examples of what Risk Reports provide.
The Metadata icon

provides the code of the actual access permission. By clicking on the Metadata icon, that permission’s details page will open to display the policies that make up that permission, and their ARNs.

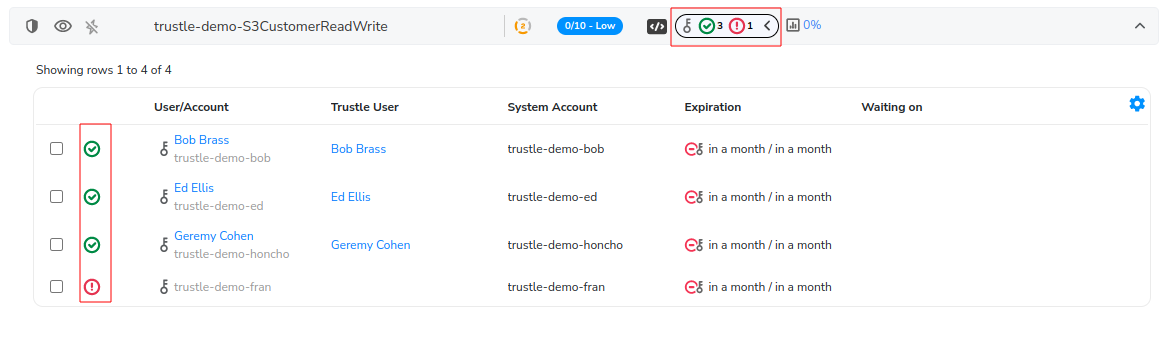
The Accesses / Statuses icon

provides a visual cue of how many Trustle Users and/or AWS Users have access to a given AWS permission.
In the below example, if we expand the Access/Statuses icon, we can see that there are three Linked (i.e., associated with Trustle Users) AWS Users associated with this group, and one unlinked AWS account (i.e., not associated with a Trustle User).
Expanding the group shows us further detail for each account/user represented by the icon.
The Services Usage icon

provides a visual indicator of what service access provided by the permissions are actually being utilized. By clicking on the Services Usage icon, that permission’s details page will open to display the AWS Services that make up that permission, and their usage information.
At the far end of the permissions row are three additional icons:

The Details

Icon, the Edit

Icon, and the Grant Access

Icon.
When clicked, the Details
Icon opens up the permissions’ details page.
We’ve already seen the Policy (via Metadata icon), Risk Report, and Services Usage tabs from icons available on the row. In addition, General, and [Permissions Object] History tabs are also provided for additional information.
The Edit
Icon opens a dialog which enables us to adjust Sensitivity Settings, Visibility Settings, and Management options.
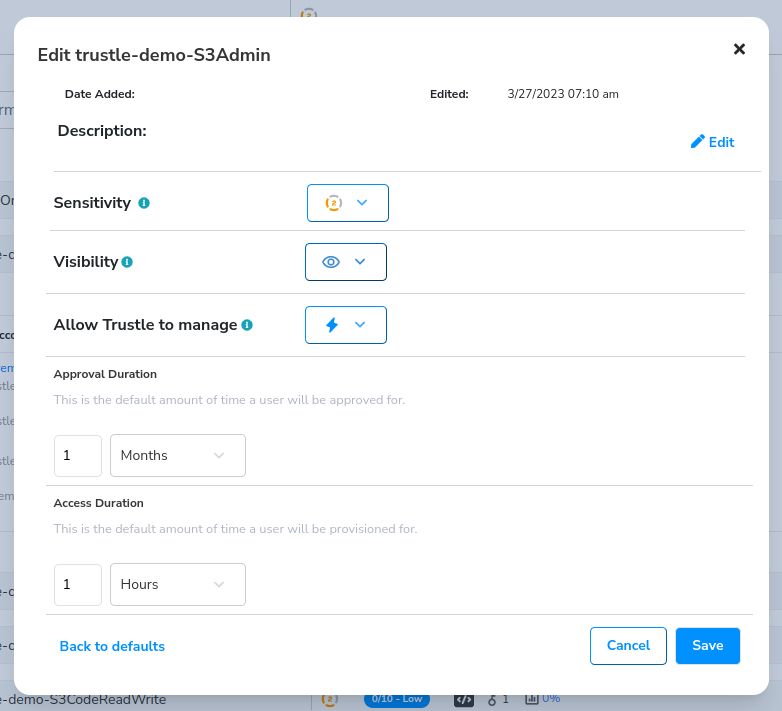
As noted earlier in the Admin walkthrough, we can define Sensitivity Settings. Once defined, they can be applied at both the AWS Connector Level (under System Settings), as well as here, on an individual resource itself.
This enables us to define a default Sensitivity Setting, but override it up or down as needed on a per-resource basis. And although Approval and Access Durations are a component of Sensitivity Settings, you can manually override that aspect of the Sensitivity Score in this dialog as well.
The Visibility setting enables us to set a particular resource as hidden or visible. If there are permissions resources in your AWS system you don’t want Trustle to make visible and offered for approval or provisioning, you can hide them from this screen.
The Allow Trustle to Manage option lets you override on a per resource-basis whether or not Trustle will manage this resource.
And finally, the Grant Access icon allows you to grant access to a Trustle user directly from the resource itself.
Congratulations on completing Chapter 3!
If you have any questions about using Trustle or this document, please contact us at [email protected].